Deploying Anubis (AI Crawler Filtering) on a Cloudron Server
-
I'm wondering whether it's possible to deploy something like Anubis (Github, Webpage) to challenge web scraper bots when visiting certain subdomains on a Cloudron instance.
I currently have another VPS which I have deployed Anubis with Nginx proxy Mangager and it works pretty well at stopping crawlers as per metrics output of Anubis.
If it can't or shouldn't be deployed on Cloudron itself, is it possible for the VPS with Nginx Proxy Manager to handle traffic and then forward it to Cloudron? Not sure how Cloudron will behave with addition of an additional reverse proxy in front of it.
-
You could technically place Anubis on your existing VPS as a reverse proxy in front of Cloudron, but you'd need to ensure that the proxy passes headers and SSL correctly to avoid breaking Cloudron services. Have you tested if Cloudron’s built-in reverse proxy supports custom middleware or chaining with another proxy? If not, isolating Anubis to only specific subdomains via your external Nginx setup may be the safer route.
-
Just an update on this. I managed to get everything working.
I set up an Anubis instance on the second VPS, with the TARGET configured as https://<cloudron-ip>:443. For the REDIRECT_DOMAINS, I specified the services I wanted to proxy through Anubis, like so:
REDIRECT_DOMAINS=app1.example.cloud,app2.example.cloudAfter that, I added those domains to Nginx Proxy Manager and pointed it at Anubis container port, and everything is now working as expected.
-
I'm interested too

-
Setup Overview
In this setup, I will be using Nginx Proxy Manager, but these instructions will also apply to other reverse proxy setups. The goal is to proxy Cloudron traffic via Anubis without disrupting the existing Cloudron installation. To achieve this, I’ll be utilizing a second VPS to deploy Anubis and to proxy traffic. This arrangement allows to proxying of selected apps through Anubis instead of the entire server.Note: This setup will not work for apps on Cloudron that require additional ports to be forwarded, beyond just port 443.
VPS Configuration
VPS 1: This VPS runs Cloudron with the apps you want to proxy.
VPS 2: This VPS runs Ubuntu Server and hosts three Docker containers:
-
Nginx Proxy Manager: This acts as the reverse proxy for traffic going to Anubis.
-
Anubis: This container forwards valid requests to the Cloudron server on VPS 1.
-
Redis: Anubis stores completed challenge data in memory by default, which is lost on restart. The Redis container provides persistent storage for this data, ensuring that Anubis retains challenge information between restarts.
The following steps assume that Docker is installed and the user is familiar with deploying a Docker Compose file.
VPS 2 Docker Compose
See below for docker compose for above mentioned container stack. I've made comments below where modification's required. For additional information on Anubis Variables, visit this link.
services:
  ngixn-proxy-manager:
    image: jc21/nginx-proxy-manager:latest
    container_name: npm
    restart: unless-stopped
    ports:
      - "127:.0.0.1:80:80"
      - "443:443"
      - "127:.0.0.1:81:81"
    volumes:
      - /home/appdata/npm/data:/data #Change this path for npm data as required
      - /home/appdata/npm/letsencrypt:/etc/letsencrypt #Change this path for npm certs as required
    networks:
      - anubis-cloudron


  anubis-cloudron-redis:
    image: redis:8-alpine
    container_name: anubis-cloudron-redis
    restart: always
    volumes:
      - redis_data:/data
    networks:
      - anubis-cloudron


  anubis-cloudron:
    image: ghcr.io/techarohq/anubis:latest
    container_name: anubis-cloudron
    ports:
      - "127.0.0.1:10000:10000" #This port can be utilised with a prometheus container for Anubis metrics
      - "127.0.0.1:8300:8300" #The network port that Anubis listens on.
    pull_policy: always
    restart: always
    depends_on:
      - anubis-cloudron-redis
    environment:
      BIND: ":8300" #The network port that Anubis listens on.
      DIFFICULTY: "4" #The difficulty of the challenge
      METRICS_BIND: ":10000" # Prometheus Metrics Port
      SERVE_ROBOTS_TXT: "true" #If set true, Anubis will serve a default robots.txt file that disallows all known AI scrapers.
      POLICY_FNAME: "/data/cfg/botPolicy.yaml" # Config file Internal location. This can be left as it is.
      TARGET: "https://<CLOUDRON-VPS-IP-ADDRESS>" #Change this to the IP address of Cloudron Server.
      TARGET_INSECURE_SKIP_VERIFY: "true" #Skip TLS certificate validation for targets that listen over https. This is required.
      REDIRECT_DOMAINS: "app1.example.cloud, app2.example.cloud" #These should match the current cloudron app sub domains. This can be expanded as required.
      COOKIE_DYNAMIC_DOMAIN: "true" #If set to true, automatically set cookie domain fields based on the hostname of the request.
      COOKIE_EXPIRATION_TIME: "168h" #The amount of time the authorization cookie is valid for.
      COOKIE_SECURE: "true"
      ED25519_PRIVATE_KEY_HEX: "4e7d024d97030b8e80f89de052494b31ff799d0ee83c238c6f22d01979ba8b54" #This is a sample key. Generate a new key by running 'openssl rand -hex 32' and paste it here
      OG_PASSTHROUGH: "false" #If set to true, Anubis will enable Open Graph tag passthrough.
    volumes:
      - "/home/appdata/anubis/cloudron.yaml:/data/cfg/botPolicy.yaml:ro" # Config file location. Change this to the location of file below in section below. This is to be manually created.

    networks:
      - anubis-cloudron


volumes:
  redis_data:

networks:
  anubis-cloudron:
    driver: bridge
Anubis - Config file
Below's the configuration file which I'm utilising for Cloudron. This setup allows both Mastodon and Pixelfed to be behind Anubis. Modify the configuration file as required depending on your Cloudron services and change mapping of config file path on docker compose file based on where this file is saved.
  - import: (data)/bots/ai-robots-txt.yaml
  - import: (data)/bots/cloudflare-workers.yaml
  - import: (data)/bots/headless-browsers.yaml
  - import: (data)/bots/us-ai-scraper.yaml
  - import: (data)/crawlers/googlebot.yaml
  - import: (data)/crawlers/bingbot.yaml
  - import: (data)/crawlers/duckduckbot.yaml
  - import: (data)/crawlers/qwantbot.yaml
  - import: (data)/crawlers/internet-archive.yaml
  - import: (data)/crawlers/kagibot.yaml
  - import: (data)/crawlers/marginalia.yaml
  - import: (data)/crawlers/mojeekbot.yaml
  - import: (data)/clients/git.yaml
  - import: (data)/common/keep-internet-working.yaml


  - name: allow-uptime-kuma
    user_agent_regex: Uptime-Kuma.*
    action: ALLOW

  - name: allow-api
    path_regex: ^/api/
    action: ALLOW

  - name: allow-assets
    action: ALLOW
    path_regex: \.(eot|ttf|woff|woff2|css|js|jpg|jpeg|png|mp4|webp|svg)$

  - name: allow-website-logos
    action: ALLOW
    path_regex: ^/hareen/website-logos/.*$

  - name: allow-well-known
    path_regex: ^/.well-known/.*$
    action: ALLOW

  - name: allow-mastodon-actors-objects
    path_regex: ^/users/[^/]+(/.*)?$
    action: ALLOW

  - name: allow-shared-inbox
    path_regex: ^/inbox$
    action: ALLOW

  - name: allow-pixelfed-actors-objects
    path_regex: ^/@[^/]+(/.*)?$
    action: ALLOW

  - name: allow-user-inbox
    path_regex: ^/@[^/]+/inbox$
    action: ALLOW

  - name: allow-nodeinfo-webfinger
    path_regex: ^/\\.well-known/(host-meta|webfinger|nodeinfo.*)$
    action: ALLOW

  - name: generic-browser
    user_agent_regex: >-
      Mozilla|Opera
    action: CHALLENGE

dnsbl: false

thresholds:
  - name: minimal-suspicion
    expression: weight <= 0
    action: ALLOW

  - name: mild-suspicion
    expression:
      all:
        - weight > 0
        - weight < 10
    action: CHALLENGE
    challenge:
      algorithm: metarefresh
      difficulty: 1
      report_as: 1

  - name: moderate-suspicion
    expression:
      all:
        - weight >= 10
        - weight < 20
    action: CHALLENGE
    challenge:
      algorithm: fast
      difficulty: 2
      report_as: 2

  - name: extreme-suspicion
    expression: weight >= 20
    action: CHALLENGE
    challenge:
      algorithm: fast
      difficulty: 4

store:
  backend: valkey
  parameters:
    url: "redis://anubis-cloudron-redis:6379/0"
Note: Redis is mapped in the configuration file and therefore creation of a config file is required prior to deploying the docker compose file above (Refer to 'store:' in above config).
Once the above setup is deployed, visit the Nginx Proxy Manager interface on Port 81, setup an account by following the on screen instructions.
DNS Provider Configuration
Visit the DNS provider, and change the ipv4 and ipv6 addresses of app1.example.cloud and app2.example.cloud, which points at VPS1 (Cloudron server) which were setup previously with Cloudron, to point at VPS2 (Anubis server) ipv4/ipv6 address instead.
Note: This change will disrupt these services till the next few steps are followed.
Nginx Proxy Mananger Configuration
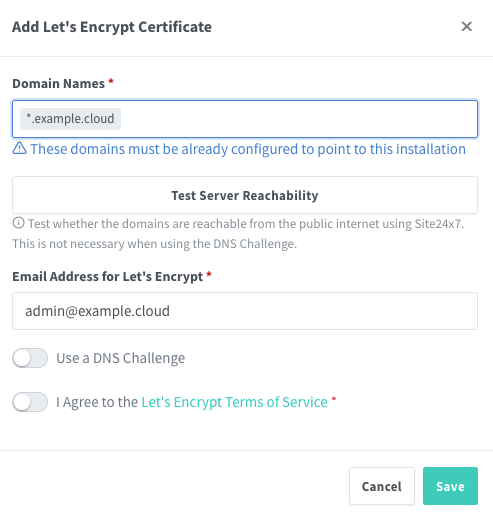
First setup a SSL cerificate for *.example.cloud by visiting the SSL Certificate Tab → Let's Encrypt Certificate. DNS challange option can be utilised here for automated validation without needing to open port 80. Instructions will be shown when the slider's enabled.

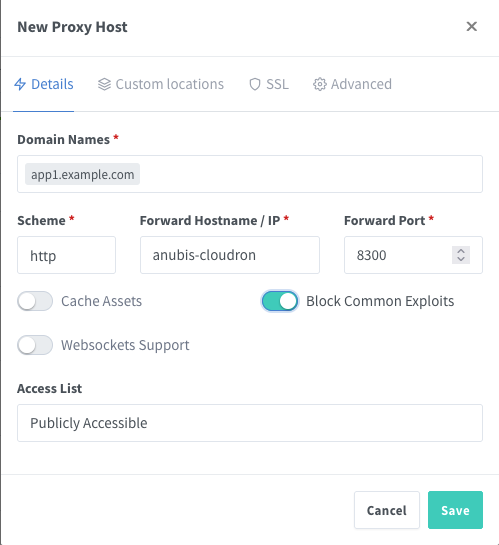
Add a Proxy Host for app1.example.cloud. Set the scheme as http and point at the Anubis container (anubis-cloudron:8300 if above docker compose file was followed).

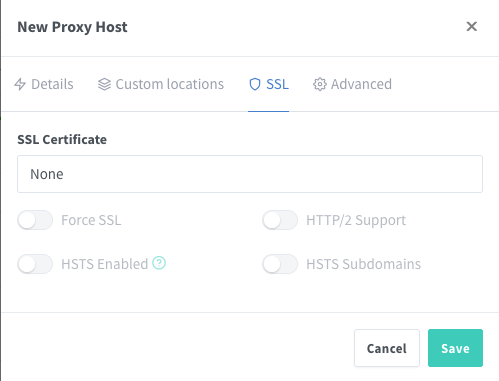
Next click SSL and select the certificate created in the previous step. Then enable Force SSL and HTTP/2 Support. Both HSTS options can also be enabled here based on the application being proxied.

Allow inbound traffic on port 443 on VPS 2, and ensure that UFW or any other firewall in use also allows traffic on this port. Once this is configured, app1.example.cloud (hosted on Cloudron) will be accessible with Anubis protection in place.
To add additional Cloudron subdomains, repeat the same steps. Don't forget to update the Docker Compose file to include the new subdomains in the REDIRECT_DOMAINS environment variable within the Anubis container configuration.
Optional Steps
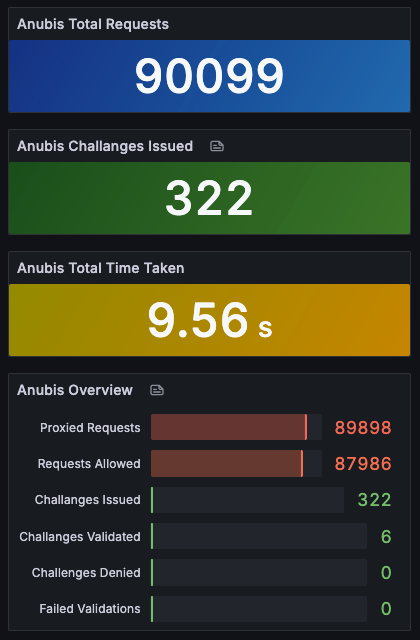
A Prometheus docker container can be deployed which can be used with Anubis Metrics Port (10000 in above docker compose) to monitor the Anubis instance with Grafana to output data similar to this.

-
-
 S SansGuidon referenced this topic on
-
This setup will not work for apps on Cloudron that require additional ports to be forwarded, beyond just port 443.
Thank you @hareen for the detailed guide. I’m interested in setting this up using a second machine on my setup at home.
Does this mean an app like gitea which has an ssh port too will not be able to use Anubis for its 443 port and use a straight port forwarding for the ssh port? (I’m a noob with this so this might be a stupid question).
What I had in mind was to have my router port forward 443 to the Anubis server but then keep all the other ports forwarded to my Cloudron server as they are now.
-
Another project of the sort is iocaine: https://iocaine.madhouse-project.org/documentation/3/getting-started/containers/ Was wondering if there's any chance to get that running.
