-
5/29/2020: As of this edit, I believe @doodlemania2's package might be a better option for most (unless you REALLY feel like using the LAMP app for like development of Pixelfed or something)
Link to @doodlemania2's app package repo Just install with Cloudron CLII am keeping this post unchanged otherwise for informational purposes, but please note the above. Thank you!
Pixelfed is A free and ethical photo sharing platform, powered by ActivityPub federation. This means posts, comments, etc are feature-compatible with Mastodon, GNU/Social, Pleroma, and other ActivityPub servers!
Site: https://pixelfed.org/
This is a step by step guide getting PixelFed working in the LAMP app. This will be useful for those that want an ActivityPub server but don't want to use Nextcloud.
The following is a literal step by step guide. Please be mindful when copying & pasting terminal commands.
Step One
Install the LAMP app to the domain of choice. I recommend using the root of a domain (IE not using a subdomain) but subdomain installs are supported.
Step Two
2. Let's clone the PixelFed repo into the app, open up the Debug -> Terminal settings for the LAMP app you just installed. Some of the following wont make much sense, but trust me when I say the way we are installing is probably the best way without making a whole new app for this.cd /app/data git clone -b dev https://github.com/pixelfed/pixelfed.git pixelfedNow we need to move the current public folder, then copy the data from pixelfed into the /app/data folder (just copy and paste these bits, it's easier that way)
cd /app/data
mv public public-original

## These two commands just move the contents of the pixelfed folder up one directory.
cd /app/data/pixelfed
find . -maxdepth 1 -exec mv {} .. \;
cd /app/data
rmdir pixelfed
Step Three
Time to install the PHP dependencies. This will likely take a few minutes. If you are using a smaller VPS please allow at least 15 minutes before killing the process.composer install --no-ansi --no-interaction --optimize-autoloaderStep Four
Let's make sure permissions are good.chown -R www-data:www-data /app/data find . -type d -exec chmod 755 {} \; # set all directories to rwx by user/group find . -type f -exec chmod 644 {} \;Step Five
Let's copy the generic config, and modify it:cp .env.example .envOnce you copied the .env file, open it up and modify the following bits to match your environment, note: Only change these bits unless you know what you are doing! The "..." signifies some scrolling between variables. Also note, you can find credentials for the LAMP app's DB, mail, and redis queue in
credentials.txtin the/app/datafolder.APP_NAME="Pixelfed Prod" ... APP_URL=http://localhost APP_DOMAIN="localhost" ADMIN_DOMAIN="localhost" SESSION_DOMAIN="localhost" ... DB_HOST=127.0.0.1 DB_DATABASE=pixelfed DB_USERNAME=pixelfed DB_PASSWORD=pixelfed ... REDIS_HOST=127.0.0.1 REDIS_PASSWORD=null ... MAIL_HOST=smtp.mailtrap.io MAIL_PORT=2525 MAIL_USERNAME=null MAIL_PASSWORD=null MAIL_ENCRYPTION=null MAIL_FROM_ADDRESS="pixelfed@example.com" MAIL_FROM_NAME="Pixelfed" ... ## Change these to 'true' (no quotes) ## If you want to activate ActivityPub ## (The Mastodon, Pleroma, etc protocol) ACTIVITY_PUB=false AP_REMOTE_FOLLOW=false AP_INBOX=falseNote:
After you register your account(s) you can disable registration by makingOPEN_REGISTRATION=trueequal toOPEN_REGISTRATION=falseStep Six
Now we need to initialize the Database, cache, and routes:cd /app/data ## Generate the security key: php artisan key:generate ## Cache configuration variables (run this command everytime you change the .env file!) php artisan config:cache ## Link storage folder: php artisan storage:link ## Only really needs to be ran once, but may need to be ran on updates: ## This sets up the database php artisan migrate --force ## Setup Horizon dashboard for Admins (to see the PHP queue) php artisan horizon:install php artisan horizon:assets ## Cache routes php artisan route:cacheStep Seven
Let's configure run.sh to start the Horizon service in the background as a job (since we can't really use systemd here)
Edit/app/data/run.shand add to it at the bottom:cd /app/data php artisan config:cache ## php artisan migrate --force php artisan route:cache php artisan horizon &This will start the horizon service after caching routes and configs. Restart the app after you change the
.envfile, or if the Horizon service stops for some reason.Step Eight (Finale!)
Now, go to the URL for your app and you should see:
Note: your
/app/datafolder should look like this (give or take)(cd /app/data && ls -a) :

Let's make your admin account! (Used for moderation, and configuration of the server once it is live.)
-
Register an account in your new Pixelfed server. Make sure to verify the email (If you did not get an email, we cna change that manually in the DB!)
-
Login to https://APP_URL/phpmyadmin using the
phpmyadmin_login.txtfile for the credentials. -
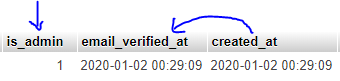
Go into the database and then select the Users table. Find your user (should be EASY) and copy the created date to the email verified column if needed, then change the is_admin from 0 to 1:
-
Logout of Pixelfed and log back in and you will be an admin with a verified email!
This should cover the whole installation of Pixelfed. Let me know if I missed anything or if there are issues with any of the above. Thanks!!
-
-
I've packaged this here: https://git.cloudron.io/doodlemania2/pixelfed it's just waiting for review but works if you'd like to try it out.
-
In Step Five, I think you should add that the values for the SQL database, Redis etc. are the ones generated by the LAMP app (in credentials.txt), aren't they?
@necrevistonnezr Technically speaking, any value that is valid will work (like an external MySQL DB, redis server, mails, etc) but yes, in this context it is assumed the admin knows these creds for their app (found in credentials.txt or by echo'ing the env vars).
Hello! It looks like you're interested in this conversation, but you don't have an account yet.
Getting fed up of having to scroll through the same posts each visit? When you register for an account, you'll always come back to exactly where you were before, and choose to be notified of new replies (either via email, or push notification). You'll also be able to save bookmarks and upvote posts to show your appreciation to other community members.
With your input, this post could be even better 💗
Register Login