[Guide] How to host Cloudron behind a reverse proxy with Tailscale
-
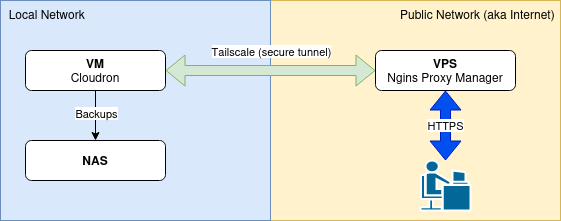
Here's my guide on how to run your local Cloudron from home or office through a public reverse proxy server on a VPS in the 'Cloud' through Tailscale. No port forwarding or network acrobatics are required!
Prerequisites
- VPS
- You don't need much for this: 1 CPU, 1GB RAM and minimal disk space
- Pay attention to the IP allocation and bandwidth allowed!
- Locally hosted Cloudron VM (fresh install)
- A domain name to use with the install
- At least 100mbps uplink to the Internet
Simple overview
Set up and configure the VPS Proxy Server
Procure and configure the VPS in the 'Cloud'. I use Vultr.com and you can get a $100 credit for two weeks to test things out (affiliate link) or DigitalOcean.com for $200 for 60 days (affiliate link).
I use Debian 12, but you can choose Ubuntu or something similar. Not tried it with RedH*t or Arch.
Ideally, you should get a VPS with direct access to the internet and an IPv4 address. Watch out as some providers try to save costs, and IPv6 and network shenanigans are out of the scope of this tutorial.
Install Docker: (ref. https://docs.docker.com/engine/install/debian/#install-using-the-convenience-script)
curl -fsSL https://get.docker.com -o get-docker.sh | sudo sh get-docker.shYou may need to install docker-compose separately:
sudo apt install docker-composePull Nginx Reverse Proxy (or your preferred reverse proxy with Let's Encrypt SSL). I use Docker Compose to keep things neat. You can find out more here: https://nginxproxymanager.com/setup/#running-the-app.
Configure your firewall - I use the one at the provider - to only allow ports 80 and 443 to the public. Wall-off SSH (22) and the Nginx Proxy Manager's admin port (81) by only allowing access from your home/office IP(s) and or Tailscale network.
Install Tailscale and set it to accept routes (this is key):
curl -fsSL https://tailscale.com/install.sh | shGet Tailscale online and accept routes (important!):
sudo tailscale up --accept-routesMake sure you have restarted and tested. You can see your node in the Tailscale control panel, and the routes have been enabled.
Ready? Let's go local.
Prepare the server for Cloudron
Install a fresh VM (ideally) with Ubuntu 22.04 (boo!).
Set your VM's IP to be fixed via DHCP or manually, as we don't want it to change again.
Install your favourite tools, such as mc and qemu-guest-agent (if you're using Qemu/Proxmox), git, and curl.
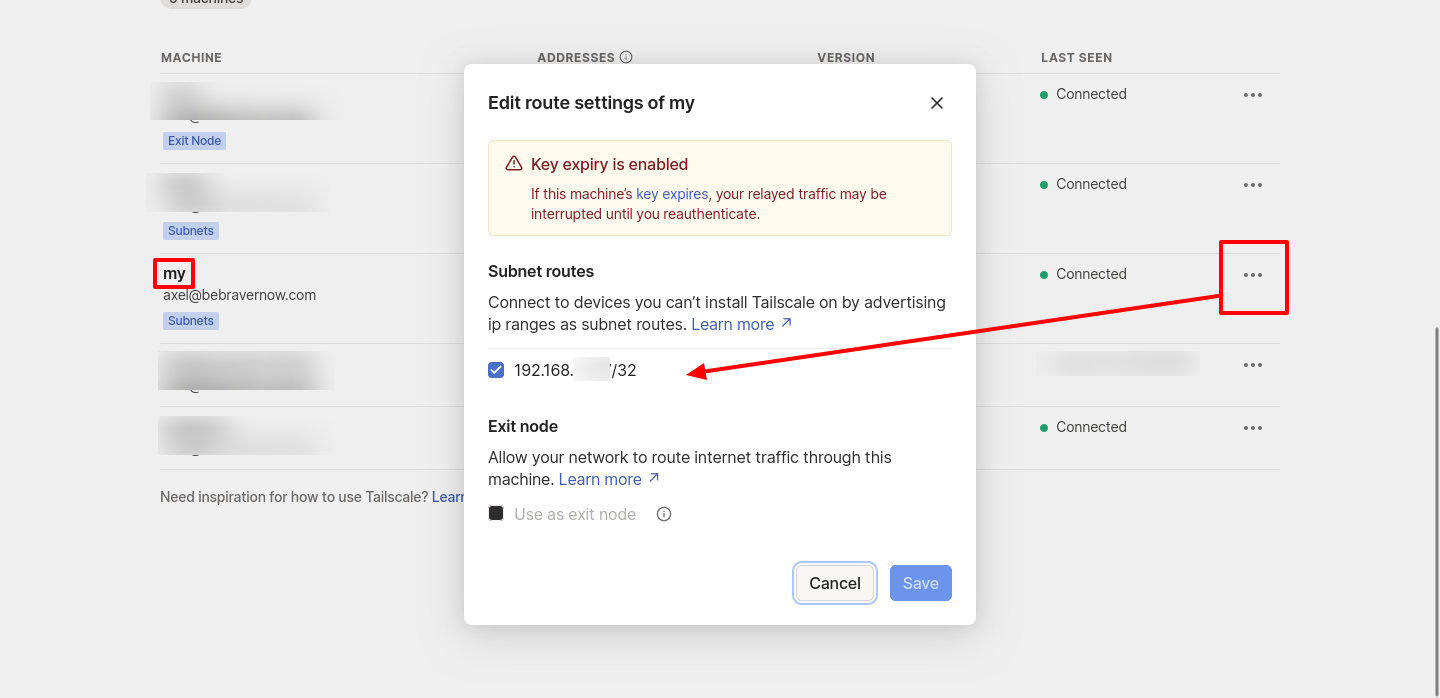
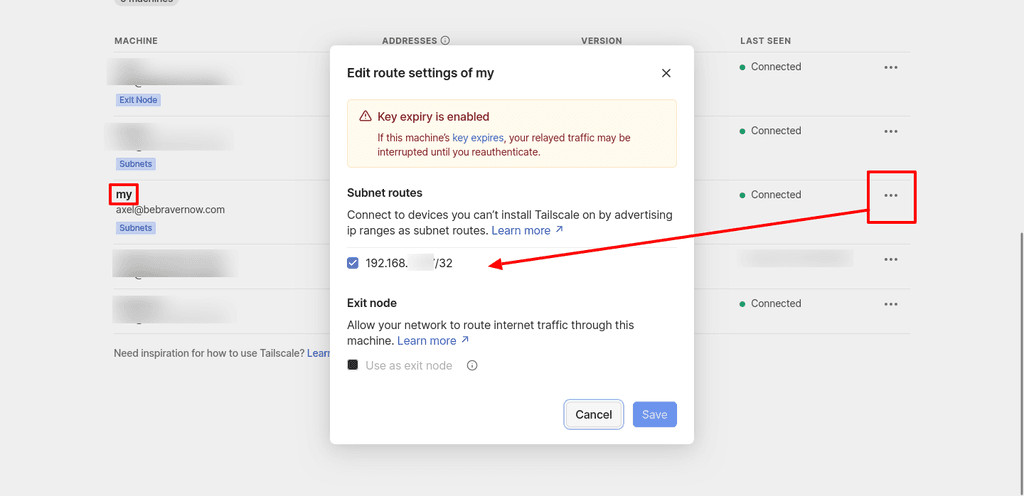
Ensure you install Tailscale on the server and run it with the option to expose its route using the local IP:
sudo tailscale up --advertise-routes=192.168.X.X/32Log in to the Tailscale control panel and enable the route!
Log on to your VPS and ping the VM's local IP to ensure our proxy can access the server.
ping 192.168.X.XAll good? If not, return a few steps and make sure your routes are exposed and accepted.
On your DNS for the domain you want to use, create two A Records, one for the root domain and one wildcard, both pointing to the VPS IP address.
On the VPS, login to Nginx Proxy Manager (http://<IP of VPS>:81) and create a wildcard SSL certificate for the domain (*.example.com).
Create a new reverse proxy entry using both the root and wild card, pointing at https://<local IP of your VM>:443.
Install and configure Cloudron
Head over to the local VM and install Cloudron (finally).
wget https://cloudron.io/cloudron-setup && chmod +x ./cloudron-setup && sudo ./cloudron-setupOnce installed, reboot and log on to the configuration wizard (https://<local IP>/).
Now come the critical bits, which took me some trial and error. Be sure to snapshot the VM before you continue to avoid reinstalling everything in case you make a mistake!
- Domain: your root domain (e.g. example.com)
- DNS Provider: whatever you are using or set it to manual and tweak it later
- Zone Name: leave it as it is (should show your root domain)
- Certificate Provider: set this to 'Self-signed/Custom' and upload the certs provided by the Nginx Proxy Manager from earlier. They'll download in a ZIP archive. You will need:
- fullchain1.pem and privkey.pem respectively
- ref. https://docs.cloudron.io/certificates/#custom-certificates
- IP Configuration: select 'Static IP Address'
- IP Address: enter the public IPv4 address of your VPS (not the local one of the VM)
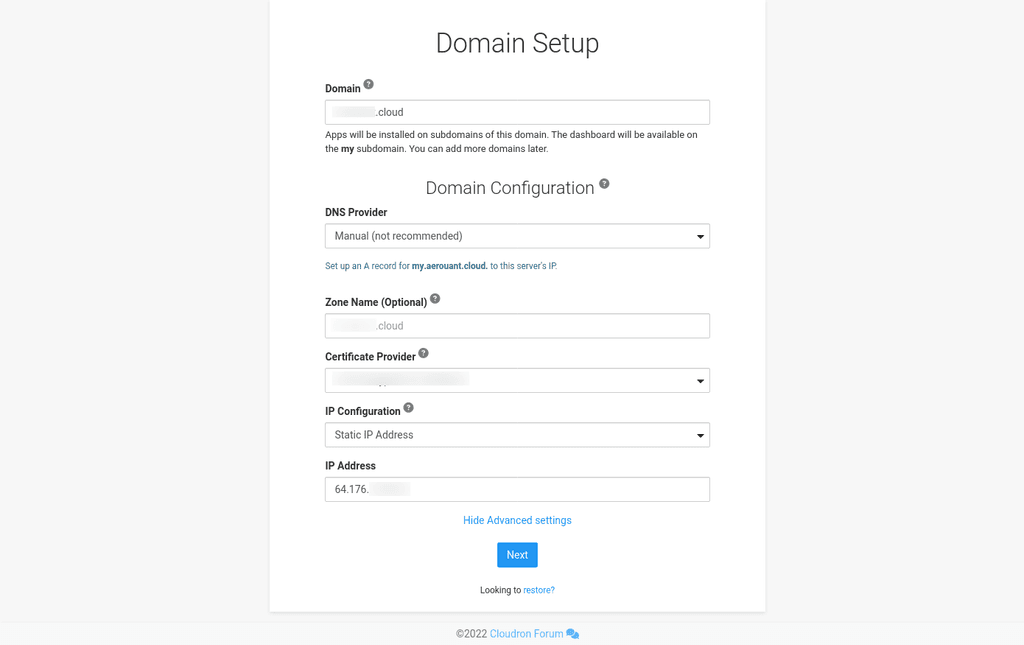
If you are sure you have taken a backup/snapshot of your VM at this point, be braver and hit the 'Next' button.
It will take a while to check itself and present you with the Cloudron account set-up screen. If not, watch for errors in the log file (the path is shown on the screen).
If all goes well, browse my.<your domain>.<tld> and log in. If not, restore to the snapshot and try again. Feel free to post your comments and questions below, and I'll do my best to help.
Finalise the set-up
Once logged on, head to settings and set up the backups. I use a local Samba share from my NAS and rsync (no encryption as the volume is already encrypted). This should make for fast, local backups. I just entered my local NAS IP address (e.g. 192.168.x.x) and login details. Remember that while Cloudron is served from behind the proxy on the VPS, the actual Cloudron server is on your local network and you can point it to local services
")
You can also set up other volumes on your NAS for photos or other stuff.
Check the email set up for our primary domain is working and it is probably showing some red marks if you chose manual DNS set up. In this case, head to your DNS and create the missing records shown in the error messages.
The reverse DNS entry (PTR record) will fail unless you change it on your VPS provider's DNS (where available). While you can host multiple Cloudrons behind the same Nginx Proxy Manager and IP, if you care about performance and email deliverability, I recommend a separate VPS and IPv4 for each or ignore the error and use an external bulk SMTP service like SMTP2GO or Mailgun.
Fin
Ensure everything you need is green, and double-check the error logs for messages. Once you are happy, install an app and enjoy your new Cloudron

Up next
The next part of this guide will focus on using Tailscale to access the Cloudron service locally without going out of the network and back in again. One of the strengths of Tailscale (and similar services) is that it can connect services directly for lower latency and increased performance.
Let me know what else you would like to see. I post this primarily as a note to myself and share it hoping you found it helpful.
Please note
Let me know your questions or comments on how I accomplished this, and note that I am not affiliated with any of the service providers, Cloudron, or companies mentioned unless stated otherwise.
The help I provide on this forum is free and constitutes my opinion, not that of my employer. Professional services are available via the link in my signature - I cannot provide any paid support in this forum. No warranties are provided or implied.
Document version control
- 2024-04-27 - v.1.0 - Initial version
- VPS
-
 3 3246 referenced this topic on
-
Great write up. If you feel like it, please convert this into a community guide . It will get published at https://docs.cloudron.io/guides/community/ .
You can send a PR at https://git.cloudron.io/cloudron/docs/-/tree/master/knowledgebase/docs/guides/community?ref_type=heads . markdown format should already work, so you can just copy/paste above . You are also welcome to add links to your service in the initial overview section (like in https://git.cloudron.io/cloudron/docs/-/blob/master/knowledgebase/docs/guides/community/firefly-iii-importer.md?ref_type=heads#overview)
-
Here's my guide on how to run your local Cloudron from home or office through a public reverse proxy server on a VPS in the 'Cloud' through Tailscale. No port forwarding or network acrobatics are required!
Prerequisites
- VPS
- You don't need much for this: 1 CPU, 1GB RAM and minimal disk space
- Pay attention to the IP allocation and bandwidth allowed!
- Locally hosted Cloudron VM (fresh install)
- A domain name to use with the install
- At least 100mbps uplink to the Internet
Simple overview
Set up and configure the VPS Proxy Server
Procure and configure the VPS in the 'Cloud'. I use Vultr.com and you can get a $100 credit for two weeks to test things out (affiliate link) or DigitalOcean.com for $200 for 60 days (affiliate link).
I use Debian 12, but you can choose Ubuntu or something similar. Not tried it with RedH*t or Arch.
Ideally, you should get a VPS with direct access to the internet and an IPv4 address. Watch out as some providers try to save costs, and IPv6 and network shenanigans are out of the scope of this tutorial.
Install Docker: (ref. https://docs.docker.com/engine/install/debian/#install-using-the-convenience-script)
curl -fsSL https://get.docker.com -o get-docker.sh | sudo sh get-docker.shYou may need to install docker-compose separately:
sudo apt install docker-composePull Nginx Reverse Proxy (or your preferred reverse proxy with Let's Encrypt SSL). I use Docker Compose to keep things neat. You can find out more here: https://nginxproxymanager.com/setup/#running-the-app.
Configure your firewall - I use the one at the provider - to only allow ports 80 and 443 to the public. Wall-off SSH (22) and the Nginx Proxy Manager's admin port (81) by only allowing access from your home/office IP(s) and or Tailscale network.
Install Tailscale and set it to accept routes (this is key):
curl -fsSL https://tailscale.com/install.sh | shGet Tailscale online and accept routes (important!):
sudo tailscale up --accept-routesMake sure you have restarted and tested. You can see your node in the Tailscale control panel, and the routes have been enabled.
Ready? Let's go local.
Prepare the server for Cloudron
Install a fresh VM (ideally) with Ubuntu 22.04 (boo!).
Set your VM's IP to be fixed via DHCP or manually, as we don't want it to change again.
Install your favourite tools, such as mc and qemu-guest-agent (if you're using Qemu/Proxmox), git, and curl.
Ensure you install Tailscale on the server and run it with the option to expose its route using the local IP:
sudo tailscale up --advertise-routes=192.168.X.X/32Log in to the Tailscale control panel and enable the route!
Log on to your VPS and ping the VM's local IP to ensure our proxy can access the server.
ping 192.168.X.XAll good? If not, return a few steps and make sure your routes are exposed and accepted.
On your DNS for the domain you want to use, create two A Records, one for the root domain and one wildcard, both pointing to the VPS IP address.
On the VPS, login to Nginx Proxy Manager (http://<IP of VPS>:81) and create a wildcard SSL certificate for the domain (*.example.com).
Create a new reverse proxy entry using both the root and wild card, pointing at https://<local IP of your VM>:443.
Install and configure Cloudron
Head over to the local VM and install Cloudron (finally).
wget https://cloudron.io/cloudron-setup && chmod +x ./cloudron-setup && sudo ./cloudron-setupOnce installed, reboot and log on to the configuration wizard (https://<local IP>/).
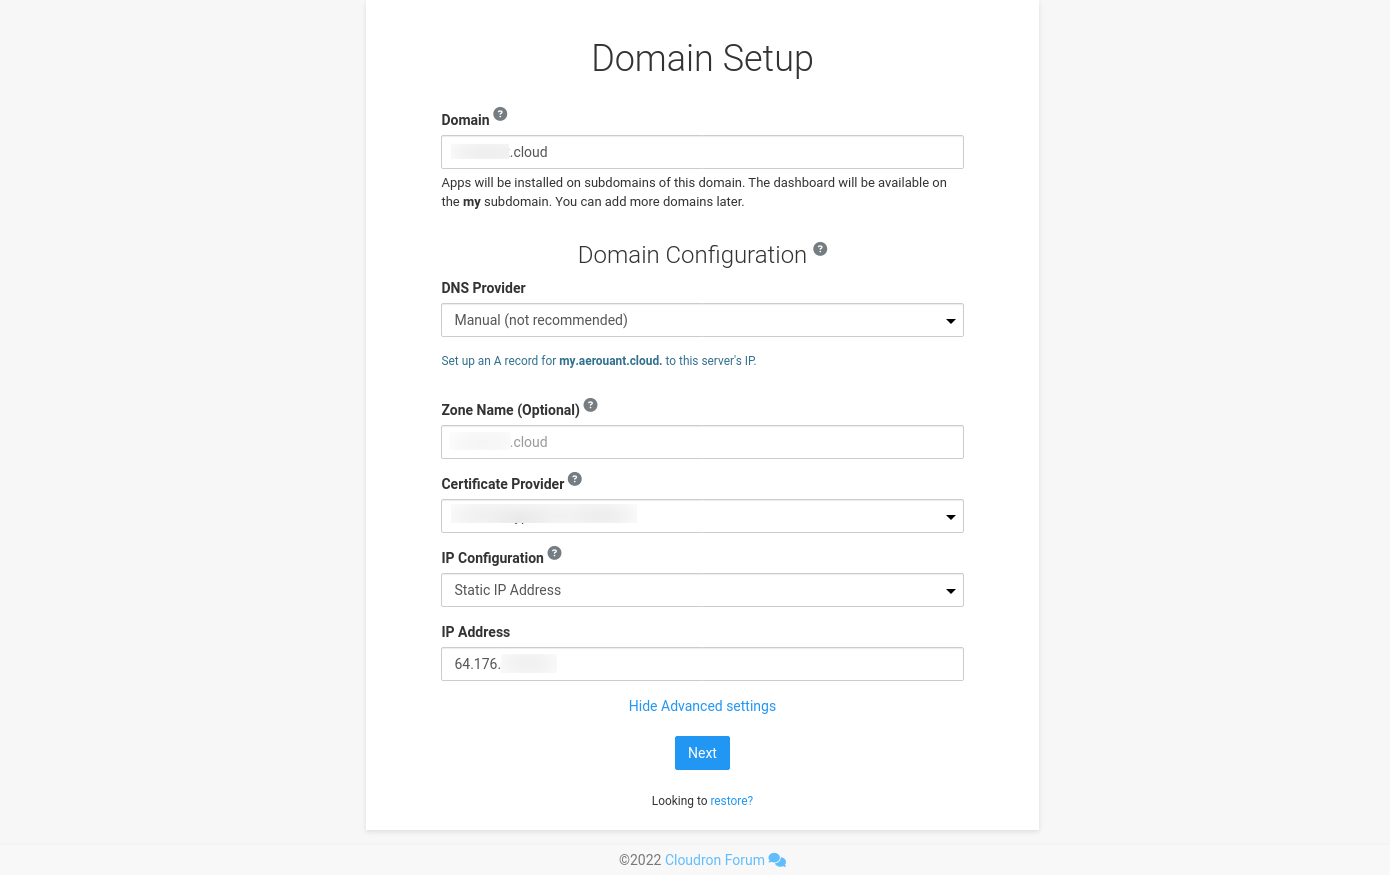
Now come the critical bits, which took me some trial and error. Be sure to snapshot the VM before you continue to avoid reinstalling everything in case you make a mistake!
- Domain: your root domain (e.g. example.com)
- DNS Provider: whatever you are using or set it to manual and tweak it later
- Zone Name: leave it as it is (should show your root domain)
- Certificate Provider: set this to 'Self-signed/Custom' and upload the certs provided by the Nginx Proxy Manager from earlier. They'll download in a ZIP archive. You will need:
- fullchain1.pem and privkey.pem respectively
- ref. https://docs.cloudron.io/certificates/#custom-certificates
- IP Configuration: select 'Static IP Address'
- IP Address: enter the public IPv4 address of your VPS (not the local one of the VM)
If you are sure you have taken a backup/snapshot of your VM at this point, be braver and hit the 'Next' button.
It will take a while to check itself and present you with the Cloudron account set-up screen. If not, watch for errors in the log file (the path is shown on the screen).
If all goes well, browse my.<your domain>.<tld> and log in. If not, restore to the snapshot and try again. Feel free to post your comments and questions below, and I'll do my best to help.
Finalise the set-up
Once logged on, head to settings and set up the backups. I use a local Samba share from my NAS and rsync (no encryption as the volume is already encrypted). This should make for fast, local backups. I just entered my local NAS IP address (e.g. 192.168.x.x) and login details. Remember that while Cloudron is served from behind the proxy on the VPS, the actual Cloudron server is on your local network and you can point it to local services
You can also set up other volumes on your NAS for photos or other stuff.
Check the email set up for our primary domain is working and it is probably showing some red marks if you chose manual DNS set up. In this case, head to your DNS and create the missing records shown in the error messages.
The reverse DNS entry (PTR record) will fail unless you change it on your VPS provider's DNS (where available). While you can host multiple Cloudrons behind the same Nginx Proxy Manager and IP, if you care about performance and email deliverability, I recommend a separate VPS and IPv4 for each or ignore the error and use an external bulk SMTP service like SMTP2GO or Mailgun.
Fin
Ensure everything you need is green, and double-check the error logs for messages. Once you are happy, install an app and enjoy your new Cloudron
Up next
The next part of this guide will focus on using Tailscale to access the Cloudron service locally without going out of the network and back in again. One of the strengths of Tailscale (and similar services) is that it can connect services directly for lower latency and increased performance.
Let me know what else you would like to see. I post this primarily as a note to myself and share it hoping you found it helpful.
Please note
Let me know your questions or comments on how I accomplished this, and note that I am not affiliated with any of the service providers, Cloudron, or companies mentioned unless stated otherwise.
The help I provide on this forum is free and constitutes my opinion, not that of my employer. Professional services are available via the link in my signature - I cannot provide any paid support in this forum. No warranties are provided or implied.
Document version control
- 2024-04-27 - v.1.0 - Initial version
@3246 Thank you very much for this tutorial. A lot of people with beefy gaming machines might like to put them to use using this technique.
- Could you please elaborate on this section:
"Configure your firewall - I use the one at the provider - to only allow ports 80 and 443 to the public. Wall-off SSH (22) and the Nginx Proxy Manager's admin port (81) by only allowing access from your home/office IP(s) and or Tailscale network."
A lot of people who have a home home/office connection do not have a fixed IP address. If and when it changes, they would lose access.
-
Also, some people would be lucky to have 100 Mbps downlink. They might be tempted to just say to themselves, well I will make do with a 10 Mbps uplink and see how it goes...
-
Later in the Summer, Cloudron will move to Ubuntu 24.04.1 LTS. Will this section be updated then?
"Prepare the server for Cloudron
Install a fresh VM (ideally) with Ubuntu 22.04 (boo!)." -
If somebody could make a desktop recording showing this process, that would be great.
- VPS
-
@3246 Thank you very much for this tutorial. A lot of people with beefy gaming machines might like to put them to use using this technique.
- Could you please elaborate on this section:
"Configure your firewall - I use the one at the provider - to only allow ports 80 and 443 to the public. Wall-off SSH (22) and the Nginx Proxy Manager's admin port (81) by only allowing access from your home/office IP(s) and or Tailscale network."
A lot of people who have a home home/office connection do not have a fixed IP address. If and when it changes, they would lose access.
-
Also, some people would be lucky to have 100 Mbps downlink. They might be tempted to just say to themselves, well I will make do with a 10 Mbps uplink and see how it goes...
-
Later in the Summer, Cloudron will move to Ubuntu 24.04.1 LTS. Will this section be updated then?
"Prepare the server for Cloudron
Install a fresh VM (ideally) with Ubuntu 22.04 (boo!)." -
If somebody could make a desktop recording showing this process, that would be great.
@LoudLemur said in [Guide] How to host Cloudron behind a reverse proxy with Tailscale:
A lot of people who have a home home/office connection do not have a fixed IP address. If and when it changes, they would lose access.
True! You used to be able to buy them for a fee, but it’s not possible anymore with my ISP…. A way around that would be great.
-
@LoudLemur said in [Guide] How to host Cloudron behind a reverse proxy with Tailscale:
A lot of people who have a home home/office connection do not have a fixed IP address. If and when it changes, they would lose access.
True! You used to be able to buy them for a fee, but it’s not possible anymore with my ISP…. A way around that would be great.
@necrevistonnezr true! Using a VPS with a fixed IP as your exit node is the way around it. You do not need to worry about your home IP, as Tailscale connects you up regardless
")
I hope I understood what you meant and answered your question. If not, please let me know.
-
@3246 Thank you very much for this tutorial. A lot of people with beefy gaming machines might like to put them to use using this technique.
- Could you please elaborate on this section:
"Configure your firewall - I use the one at the provider - to only allow ports 80 and 443 to the public. Wall-off SSH (22) and the Nginx Proxy Manager's admin port (81) by only allowing access from your home/office IP(s) and or Tailscale network."
A lot of people who have a home home/office connection do not have a fixed IP address. If and when it changes, they would lose access.
-
Also, some people would be lucky to have 100 Mbps downlink. They might be tempted to just say to themselves, well I will make do with a 10 Mbps uplink and see how it goes...
-
Later in the Summer, Cloudron will move to Ubuntu 24.04.1 LTS. Will this section be updated then?
"Prepare the server for Cloudron
Install a fresh VM (ideally) with Ubuntu 22.04 (boo!)." -
If somebody could make a desktop recording showing this process, that would be great.
@LoudLemur said in [Guide] How to host Cloudron behind a reverse proxy with Tailscale:
- Could you please elaborate on this section:
I'll be happy to try
A lot of people who have a home home/office connection do not have a fixed IP address. If and when it changes, they would lose access.
I meant the remote VPS in the datacenter, not the home server. Sorry, I will aim to clarify that in the next edit. You don't need to worry about opening ports and IP addresses for your home server (anymore)!
- Also, some people would be lucky to have 100 Mbps downlink. They might be tempted to just say to themselves, well I will make do with a 10 Mbps uplink and see how it goes...
I guess this depends on how you use it. I have two Nextcloud instances, one for work and one for the family. Both see quite a bit of use, but I'd struggle to say what the bandwidth allocation needs to be without investigating further.
I'd say 10mbps should be a minimum in both directions. You can also use Nginx Proxy Manager (etc) to cache static assets, but if you are sharing a lot of large media files you will either have to wait or pay for a larger VPS and host it fully remotely.
- Later in the Summer, Cloudron will move to Ubuntu 24.04.1 LTS. Will this section be updated then?
"Prepare the server for Cloudron
Install a fresh VM (ideally) with Ubuntu 22.04 (boo!)."
Ha! I was joking
Ubuntu is OK, but I do dislike some of the (stuff they have been called up on before  previously.
- If somebody could make a desktop recording showing this process, that would be great.
That's a cool idea, and I will look to do a live stream or recording of this next time I set it up. Anything in particular that you would find helpful I'd focus on during the process?
-
@LoudLemur said in [Guide] How to host Cloudron behind a reverse proxy with Tailscale:
- Could you please elaborate on this section:
I'll be happy to try
A lot of people who have a home home/office connection do not have a fixed IP address. If and when it changes, they would lose access.
I meant the remote VPS in the datacenter, not the home server. Sorry, I will aim to clarify that in the next edit. You don't need to worry about opening ports and IP addresses for your home server (anymore)!
- Also, some people would be lucky to have 100 Mbps downlink. They might be tempted to just say to themselves, well I will make do with a 10 Mbps uplink and see how it goes...
I guess this depends on how you use it. I have two Nextcloud instances, one for work and one for the family. Both see quite a bit of use, but I'd struggle to say what the bandwidth allocation needs to be without investigating further.
I'd say 10mbps should be a minimum in both directions. You can also use Nginx Proxy Manager (etc) to cache static assets, but if you are sharing a lot of large media files you will either have to wait or pay for a larger VPS and host it fully remotely.
- Later in the Summer, Cloudron will move to Ubuntu 24.04.1 LTS. Will this section be updated then?
"Prepare the server for Cloudron
Install a fresh VM (ideally) with Ubuntu 22.04 (boo!)."
Ha! I was joking
Ubuntu is OK, but I do dislike some of the (stuff they have been called up on before previously.- If somebody could make a desktop recording showing this process, that would be great.
That's a cool idea, and I will look to do a live stream or recording of this next time I set it up. Anything in particular that you would find helpful I'd focus on during the process?
@3246 said in [Guide] How to host Cloudron behind a reverse proxy with Tailscale:
If somebody could make a desktop recording showing this process, that would be great.
That's a cool idea, and I will look to do a live stream or recording of this next time I set it up. Anything in particular that you would find helpful I'd focus on during the process?That Ubuntu spyware in 16.04 was so blatant, I couldn't work out why they did it. The community reaction was so predictable, yet still they went ahead with it. I still can't understand the thinking there.
Nowadays, i think the move to systemd is a bad decision. I wonder what people here think about that.
Anyway, I hope you let us know in advance when a livestream is going to happen. I hope you make it as easy to understand for non-tech people as possible.
-
Quick update to let you know that further testing resulted in some tweaks (will update main post soon) and that sadly email and anything needing different ports still does not work even through the magic of Tailscale

TL;DR: Yes, you absolutely can run Cloudron through Tailscale (and plain-ol Wireguard too); No, it's not perfect and things that need different ports to 443 will likely not work without additional iptables tweaks if at all
-
Thanks for this write-up. You can easily adjust this to use a wireguard tunnel (apt install wireguard-tools) and port forwarding instead of Tailscale and a reverse proxy. Just use destination NAT and source NAT to route all outbound traffic through a VPS (I use a cheap 1€/month VPS) with a public ip and forward inbound ports to your private server behind a NAT (eg. at home, etc). This works, even for email.
The concept is the same as with Tailscale above, but without a reverse proxy and port forwarding instead (making email etc. work). Just use the following Wireguard configs (adjust to your specific needs):
Wireguard config (/etc/wireguard/wg0.conf) on your public VPS (IP: 1.2.3.4)
[Interface]
PrivateKey = AAAAAAAAABBBBBBBBBCCCCCC=   # (<- server privte key)
Address = 10.10.10.2/32
ListenPort = 51822

PreUp = sysctl -w net.ipv4.ip_forward=1

# (replace ens6 with your server network interface)
PreUp = iptables -t nat -A POSTROUTING -o ens6 -j MASQUERADE
PostDown = iptables -t nat -D POSTROUTING -o ens6 -j MASQUERADE

PreUp = iptables -t nat -A PREROUTING -i ens6 -p tcp --dport 80 -j DNAT --to-destination 10.10.10.1:80
PostDown = iptables -t nat -D PREROUTING -i ens6 -p tcp --dport 80 -j DNAT --to-destination 10.10.10.1:80

PreUp = iptables -t nat -A PREROUTING -i ens6 -p tcp --dport 443 -j DNAT --to-destination 10.10.10.1:443
PostDown = iptables -t nat -D PREROUTING -i ens6 -p tcp --dport 443 -j DNAT --to-destination 10.10.10.1:443

PreUp = iptables -t nat -A PREROUTING -i ens6 -p tcp --dport 25 -j DNAT --to-destination 10.10.10.1:25
PostDown = iptables -t nat -D PREROUTING -i ens6 -p tcp --dport 25 -j DNAT --to-destination 10.10.10.1:25

PreUp = iptables -t nat -A PREROUTING -i ens6 -p tcp --dport 465 -j DNAT --to-destination 10.10.10.1:465
PostDown = iptables -t nat -D PREROUTING -i ens6 -p tcp --dport 465 -j DNAT --to-destination 10.10.10.1:465

PreUp = iptables -t nat -A PREROUTING -i ens6 -p tcp --dport 587 -j DNAT --to-destination 10.10.10.1:587
PostDown = iptables -t nat -D PREROUTING -i ens6 -p tcp --dport 587 -j DNAT --to-destination 10.10.10.1:587

PreUp = iptables -t nat -A PREROUTING -i ens6 -p tcp --dport 993 -j DNAT --to-destination 10.10.10.1:993
PostDown = iptables -t nat -D PREROUTING -i ens6 -p tcp --dport 993 -j DNAT --to-destination 10.10.10.1:993

PreUp = iptables -t nat -A PREROUTING -i ens6 -p tcp --dport 3478 -j DNAT --to-destination 10.10.10.1:3478
PostDown = iptables -t nat -D PREROUTING -i ens6 -p tcp --dport 3478 -j DNAT --to-destination 10.10.10.1:3478

PreUp = iptables -t nat -A PREROUTING -i ens6 -p tcp --dport 4190 -j DNAT --to-destination 10.10.10.1:4190
PostDown = iptables -t nat -D PREROUTING -i ens6 -p tcp --dport 4190 -j DNAT --to-destination 10.10.10.1:4190

PreUp = iptables -t nat -A PREROUTING -i ens6 -p tcp --dport 5349 -j DNAT --to-destination 10.10.10.1:5349
PostDown = iptables -t nat -D PREROUTING -i ens6 -p tcp --dport 5349 -j DNAT --to-destination 10.10.10.1:5349

PreUp = iptables -t nat -A PREROUTING -i ens6 -p tcp --dport 222 -j DNAT --to-destination 10.10.10.1:222
PostDown = iptables -t nat -D PREROUTING -i ens6 -p tcp --dport 222 -j DNAT --to-destination 10.10.10.1:222

[Peer]
PublicKey = AAAAAABBBBBBCCCCC= (<- private servers public key)
AllowedIPs = 10.10.10.1
PersistentKeepalive = 25
(If you use the TURN server, you might want to forward additional port ranges)
Wireguard config (/etc/wireguard/wg0.conf) on your private server:
[Interface]
PrivateKey = AAAAAABBBBBBCCCCC= (<- private servers private key)
Address = 10.10.10.1
ListenPort = 51821

[Peer]
PublicKey = AAAAAABBBBBBCCCCC= (<- public VPSpublic key)
Endpoint = 1.2.3.4:51822
AllowedIPs = 0.0.0.0/0
PersistentKeepalive = 25
During install (or after setting up the Wireguard tunnel), make sure you set your Cloudrons public IP manually to "Static IP" and enter your public VPS ip address.
Don't forget to set Wireguard to start as a service and enjoy your Cloudron instance on a home server.
systemctl enable wg-quick@wg0.service
systemctl daemon-reload
systemctl start wg-quick@wg0
This is nothing I would recommend for an enterprise grade deployment, but might be suitable for a testing/development instance.
-
@jhoney12 Are you a bot?
-
N NCKNE referenced this topic on
Hello! It looks like you're interested in this conversation, but you don't have an account yet.
Getting fed up of having to scroll through the same posts each visit? When you register for an account, you'll always come back to exactly where you were before, and choose to be notified of new replies (either via email, or push notification). You'll also be able to save bookmarks and upvote posts to show your appreciation to other community members.
With your input, this post could be even better 💗
Register Login