Setting up an Automated Blog using n8n & Tiny Tiny RSS
-
In this little write up I'll be discussing how to setup n8n to post automatically to Wordpress using an aggregated RSS feed via tiny tiny rss. Optionally, you can have this also post to twitter, discord, facebook, etc as well (I have mine setup for Facebook so that's what I'll be discussing.)
Firstly, you'll need Cloudron setup, plus:
- Tiny Tiny RSS (This can be a new or currently active app!)
- WordPress (Managed or Unmanaged doesn't matter, also this should be a new setup specific for this but it's not totally required.)
- Of course, n8n app as well
WordPress Setup
This one is pretty simple.
- Login to WordPress and make sure to change the admin password (default is
changeme) - Install the following plugins:
- https://github.com/WP-API/Basic-Auth
- Jetpack
- (Optional) WP-Coder by Wow-Company
- (Optional) Header Footer Code Manager By 99robots
- The optional bits make it easier to add AdSense or other ads to the blog site.
- Login to Jetpack, link the site to it if not already.
- (Optional) Setup Jetpack to auto share to any of your social medias.
- This is done in Settings -> Sharing -> Configure Social Media
- Make sure to "allow all admins and editors access to post" so your bot account can post.
- Create a new bot account (call it whatever, make the name human readable since people will see it). Give it a VERY complex password, at LEAST 24 - 32 Characters in length.
Tiny Tiny RSS
Install this as normal. Setup a few RSS feeds you would like automatically posted. Copy the secret link of the
All Articlessection. (Button is next to title in second column) Save this for later - it's needed for n8n.

n8n Setup
Install n8n and login. Create a new Workflow - name it whatever you would like.
- Copy the following text from: https://gist.github.com/mitchellurgero/4d727b6821b21c8b0fe794b9bebf6cc5
- Click anywhere in the workflow, and press
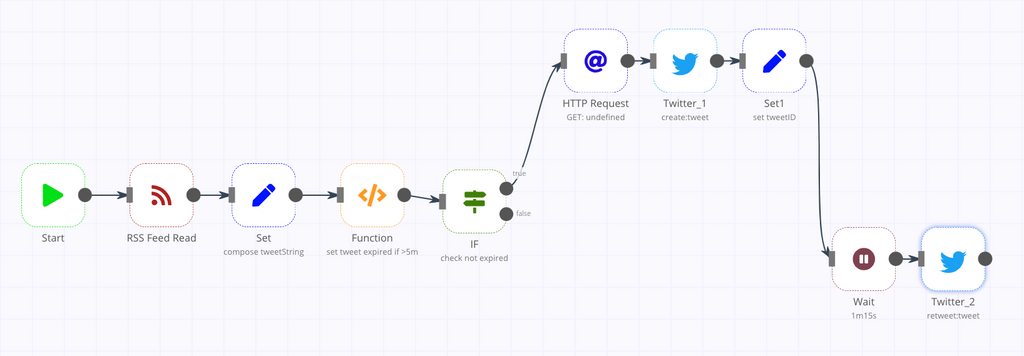
CTRL+V. You should now see something similar to:

- Edit the
RSS Feed Readto paste in that Secret Link from the Tiny Tiny RSS Setup. - Edit
WordPressand for CredentialsCreate Newand fill in the data with the bot account and the full URL to your WordPress install.
If all is done correctly, you now have setup n8n & WordPress as an Automated blog setup, maybe even with social integration. If you would like to see the end result, check out my own version of this here:
And also, let me know if you have any issues, or if something needs more clarification - this was a quick write up so I may have missed something.
Some may ask - if I am setup to post to facebook, why bother with WordPress. That is because the facebook posts link back to the wordpress site (which I have setup adsense on) for some tiny tiny bit of extra $$$ plus facebook is much easier to moderate comments on

--
https://urgero.org
~ Professional Nerd. Freelance Programmer. ~ -
In this little write up I'll be discussing how to setup n8n to post automatically to Wordpress using an aggregated RSS feed via tiny tiny rss. Optionally, you can have this also post to twitter, discord, facebook, etc as well (I have mine setup for Facebook so that's what I'll be discussing.)
Firstly, you'll need Cloudron setup, plus:
- Tiny Tiny RSS (This can be a new or currently active app!)
- WordPress (Managed or Unmanaged doesn't matter, also this should be a new setup specific for this but it's not totally required.)
- Of course, n8n app as well
WordPress Setup
This one is pretty simple.
- Login to WordPress and make sure to change the admin password (default is
changeme) - Install the following plugins:
- https://github.com/WP-API/Basic-Auth
- Jetpack
- (Optional) WP-Coder by Wow-Company
- (Optional) Header Footer Code Manager By 99robots
- The optional bits make it easier to add AdSense or other ads to the blog site.
- Login to Jetpack, link the site to it if not already.
- (Optional) Setup Jetpack to auto share to any of your social medias.
- This is done in Settings -> Sharing -> Configure Social Media
- Make sure to "allow all admins and editors access to post" so your bot account can post.
- Create a new bot account (call it whatever, make the name human readable since people will see it). Give it a VERY complex password, at LEAST 24 - 32 Characters in length.
Tiny Tiny RSS
Install this as normal. Setup a few RSS feeds you would like automatically posted. Copy the secret link of the
All Articlessection. (Button is next to title in second column) Save this for later - it's needed for n8n.
n8n Setup
Install n8n and login. Create a new Workflow - name it whatever you would like.
- Copy the following text from: https://gist.github.com/mitchellurgero/4d727b6821b21c8b0fe794b9bebf6cc5
- Click anywhere in the workflow, and press
CTRL+V. You should now see something similar to:
- Edit the
RSS Feed Readto paste in that Secret Link from the Tiny Tiny RSS Setup. - Edit
WordPressand for CredentialsCreate Newand fill in the data with the bot account and the full URL to your WordPress install.
If all is done correctly, you now have setup n8n & WordPress as an Automated blog setup, maybe even with social integration. If you would like to see the end result, check out my own version of this here:
And also, let me know if you have any issues, or if something needs more clarification - this was a quick write up so I may have missed something.
Some may ask - if I am setup to post to facebook, why bother with WordPress. That is because the facebook posts link back to the wordpress site (which I have setup adsense on) for some tiny tiny bit of extra $$$ plus facebook is much easier to moderate comments on
-
In this little write up I'll be discussing how to setup n8n to post automatically to Wordpress using an aggregated RSS feed via tiny tiny rss. Optionally, you can have this also post to twitter, discord, facebook, etc as well (I have mine setup for Facebook so that's what I'll be discussing.)
Firstly, you'll need Cloudron setup, plus:
- Tiny Tiny RSS (This can be a new or currently active app!)
- WordPress (Managed or Unmanaged doesn't matter, also this should be a new setup specific for this but it's not totally required.)
- Of course, n8n app as well
WordPress Setup
This one is pretty simple.
- Login to WordPress and make sure to change the admin password (default is
changeme) - Install the following plugins:
- https://github.com/WP-API/Basic-Auth
- Jetpack
- (Optional) WP-Coder by Wow-Company
- (Optional) Header Footer Code Manager By 99robots
- The optional bits make it easier to add AdSense or other ads to the blog site.
- Login to Jetpack, link the site to it if not already.
- (Optional) Setup Jetpack to auto share to any of your social medias.
- This is done in Settings -> Sharing -> Configure Social Media
- Make sure to "allow all admins and editors access to post" so your bot account can post.
- Create a new bot account (call it whatever, make the name human readable since people will see it). Give it a VERY complex password, at LEAST 24 - 32 Characters in length.
Tiny Tiny RSS
Install this as normal. Setup a few RSS feeds you would like automatically posted. Copy the secret link of the
All Articlessection. (Button is next to title in second column) Save this for later - it's needed for n8n.
n8n Setup
Install n8n and login. Create a new Workflow - name it whatever you would like.
- Copy the following text from: https://gist.github.com/mitchellurgero/4d727b6821b21c8b0fe794b9bebf6cc5
- Click anywhere in the workflow, and press
CTRL+V. You should now see something similar to:
- Edit the
RSS Feed Readto paste in that Secret Link from the Tiny Tiny RSS Setup. - Edit
WordPressand for CredentialsCreate Newand fill in the data with the bot account and the full URL to your WordPress install.
If all is done correctly, you now have setup n8n & WordPress as an Automated blog setup, maybe even with social integration. If you would like to see the end result, check out my own version of this here:
And also, let me know if you have any issues, or if something needs more clarification - this was a quick write up so I may have missed something.
Some may ask - if I am setup to post to facebook, why bother with WordPress. That is because the facebook posts link back to the wordpress site (which I have setup adsense on) for some tiny tiny bit of extra $$$ plus facebook is much easier to moderate comments on
@murgero awesome write up!
-
I've set it up, and it works well in terms of getting the content from the feeds and creating a new post in Wordpress. However, unlike yours, my Wordpress posts display no images, just a placeholder image (the gray square with the x). Is there an extra setting I need to tweak, or is that dependent on the source? Thanks again!
A life lived in fear is a life half-lived
-
I've set it up, and it works well in terms of getting the content from the feeds and creating a new post in Wordpress. However, unlike yours, my Wordpress posts display no images, just a placeholder image (the gray square with the x). Is there an extra setting I need to tweak, or is that dependent on the source? Thanks again!
@scooke in my twitter crossposter on n8n you have to load the image using an HTTP Read node
Indie app dev, huge fan of Cloudron PaaS, scratching my itches : communityapps.appx.uk
-
@scooke in my twitter crossposter on n8n you have to load the image using an HTTP Read node
@timconsidine I just edited my question to hone in on Wordpress as the place I'm hoping to get images shown. Do you think your comment for Twitter applies to Wordpress too? If so, what is the "HTTP Read node" and where in the workflow does it need to go? Thank you!
A life lived in fear is a life half-lived
-
@timconsidine I just edited my question to hone in on Wordpress as the place I'm hoping to get images shown. Do you think your comment for Twitter applies to Wordpress too? If so, what is the "HTTP Read node" and where in the workflow does it need to go? Thank you!
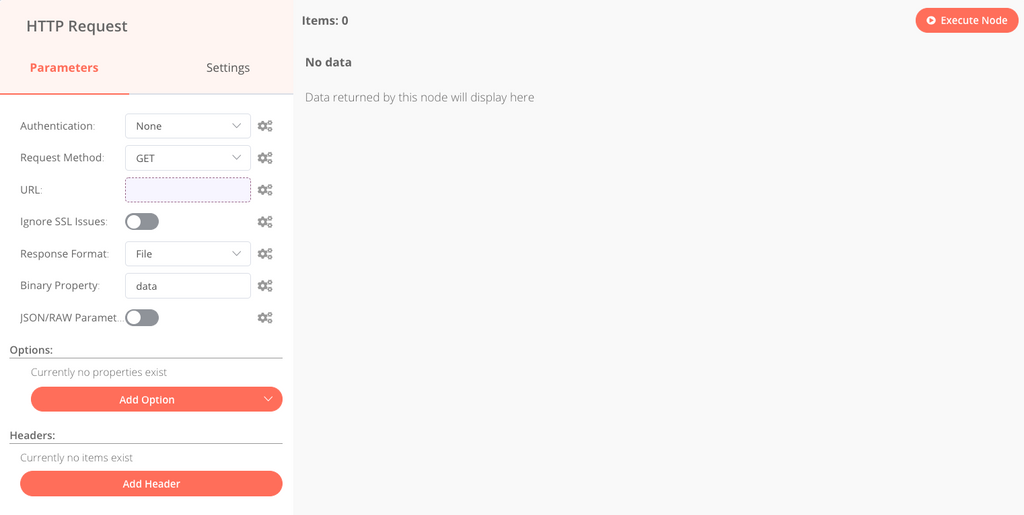
@scooke I mis-typed on name of node : it is HTTP Request
I inserted it after the IF.
Screenshot follows.Basically you set it to take the image url and save it as binary data
Then in the next step you can post the binary data.
Although please note, I don't know what parameters the Wordpress node takes. -
@timconsidine I just edited my question to hone in on Wordpress as the place I'm hoping to get images shown. Do you think your comment for Twitter applies to Wordpress too? If so, what is the "HTTP Read node" and where in the workflow does it need to go? Thank you!
-
@timconsidine I just edited my question to hone in on Wordpress as the place I'm hoping to get images shown. Do you think your comment for Twitter applies to Wordpress too? If so, what is the "HTTP Read node" and where in the workflow does it need to go? Thank you!
-
@timconsidine I just edited my question to hone in on Wordpress as the place I'm hoping to get images shown. Do you think your comment for Twitter applies to Wordpress too? If so, what is the "HTTP Read node" and where in the workflow does it need to go? Thank you!
Hello! It looks like you're interested in this conversation, but you don't have an account yet.
Getting fed up of having to scroll through the same posts each visit? When you register for an account, you'll always come back to exactly where you were before, and choose to be notified of new replies (either via email, or push notification). You'll also be able to save bookmarks and upvote posts to show your appreciation to other community members.
With your input, this post could be even better 💗
Register Login