Ubuntu 20.04: How to Extend Partition (For Noobs)
-
@humptydumpty said in Ubuntu 20.04: How to Extend Partition (For Noobs):
how do you make code blocks have a darker background/box around them?
by using the super secret markdown code tag

-
I upgraded my Contabo VPS and signed up for the double NVME storage extension. Contabo did the upgrade but informed me that the disk is a manual task that I need to perform myself. I spent an hour trying to find the proper way to do that because the docs provided by Contabo are outdated. They also mentioned LVM and I wasn't sure if my VPS was using that or not (turns out that it doesn't). Anyway, here's the detailed blog post that guided me through the process.
Source: https://pocketadmin.tech/en/ubuntu-20-extend-partition/
I'm also going to list all the steps here just in case the link 404s in the future.
Our Ubuntu 20 is installed on Hyper-V. First, let’s check the size of the file system by running df -h (all commands are executed as root):
# df -h
Filesystem           Size  Used Avail Use% Mounted on
tmpfs            394M         1,4M  392M            1% /run
/dev/sda3         24G         7,4G   16G           33% /
tmpfs            2,0G            0  2,0G            0% /dev/shm
tmpfs            5,0M            0  5,0M            0% /run/lock
tmpfs            4,0M            0  4,0M            0% /sys/fs/cgroup
/dev/sda2        512M         7,8M  505M            2% /boot/efi
tmpfs            394M         144K  394M            1% /run/user/1000
Our system partition, mounted in /, is 24 GB in size.
Let’s see the output fdisk -l:
# fdisk -l
Disk /dev/sda: 25 GiB, 26843545600 bytes, 52428800 sectors
Disk model: Virtual Disk
Units: sectors of 1 * 512 = 512 bytes
Sector size (logical/physical): 512 bytes / 4096 bytes
I/O size (minimum/optimal): 4096 bytes / 4096 bytes
Disklabel type: gpt
Disk identifier: F5F02D9D-060D-422F-BA27-1981A6CA23F4

Device       Start      End  Sectors  Size Type
/dev/sda1     2048     4095     2048    1M BIOS boot
/dev/sda2     4096  1054719  1050624  513M EFI System
/dev/sda3  1054720 52426751 51372032 24.5G Linux filesystem
In this example, we have 1 disk /dev/sda with a size of 25 gigabytes, which is divided into 3 logical ones: /dev/sda1, /dev/sda2 and /dev/sda3 with the Linux filesystem type – we are interested in it.
Increasing disk size
In a virtualization environment, we increase the size of the hard disk of our virtual machine. Most likely, your virtualization system will ask you to turn off the VM first. I increased the disk to 30 gigabytes, start the machine:
#fdisk -l
Disk /dev/sda: 30 GiB, 32212254720 bytes, 62914560 sectors
Disk model: Virtual Disk
Units: sectors of 1 * 512 = 512 bytes
Sector size (logical/physical): 512 bytes / 4096 bytes
I/O size (minimum/optimal): 4096 bytes / 4096 bytes
Disklabel type: gpt
Disk identifier: F5F02D9D-060D-422F-BA27-1981A6CA23F4

Device       Start      End  Sectors  Size Type
/dev/sda1     2048     4095     2048    1M BIOS boot
/dev/sda2     4096  1054719  1050624  513M EFI System
/dev/sda3  1054720 52426751 51372032 24.5G Linux filesystem
Ubuntu 20 extend partition
Attention! Before starting work on expanding the system partition, be sure to make a backup copy of your data!After increasing the size of the disk, you need to increase the system partition itself. Let’s execute fdisk /dev/sda, where /dev/sda is the label of our disk (Disk /dev/sda):
# fdisk /dev/sda

Welcome to fdisk (util-linux 2.32.1).
Changes will remain in memory only, until you decide to write them.
Be careful before using the write command.

Command (m for help):
We enter p to look at the list of partitions:
Command (m for help): p

Disk /dev/sda: 30 GiB, 32212254720 bytes, 62914560 sectors
Disk model: Virtual Disk
Units: sectors of 1 * 512 = 512 bytes
Sector size (logical/physical): 512 bytes / 4096 bytes
I/O size (minimum/optimal): 4096 bytes / 4096 bytes
Disklabel type: gpt
Disk identifier: F5F02D9D-060D-422F-BA27-1981A6CA23F4

Device       Start      End  Sectors  Size Type
/dev/sda1     2048     4095     2048    1M BIOS boot
/dev/sda2     4096  1054719  1050624  513M EFI System
/dev/sda3  1054720 52426751 51372032 24.5G Linux filesystem
To expand a partition, you must first delete information about it. To do this, enter d and specify the partition (3 for /dev/sda3):
Command (m for help): d
Partition number (1-3, default 3): 3

Partition 3 has been deleted.
In this case, only the record about the partition is deleted, the data itself remains on the disk!
Enter n – creating a new partition
Command (m for help): nNext, we indicate the number of the partition:
Partition number (3-128, default 3):3Next, the starting and ending sectors are indicated. Be sure to check that they match the hyphenated values. This way we use all the unallocated space:
First sector (1054720-62914526, default 1054720): 1054720
Last sector, +/-sectors or +/-size{K,M,G,T,P} (1054720-62914526, default 62914526): 62914526

Created a new partition 3 of type 'Linux filesystem' and of size 29.5 GiB.
As you can see, a 29.5 gigabyte partition was created with the Linux filesystem type.
It will also ask if we want to delete the current filesystem type. We refuse:
Partition #3 contains a ext4 signature.

Do you want to remove the signature? [Y]es/[N]o: N
It remains only to save the partition table:
Command (m for help): wReboot the virtual machine:
# rebootNow we will use the resize2fs utility (for ext4) to increase the size of the filesystem:
# resize2fs /dev/sda3

resize2fs 1.45.6 (20-Mar-2020)
open: Permission denied while opening /dev/sda3
n0mit@n0mit-vm:~$ sudo resize2fs /dev/sda3
resize2fs 1.45.6 (20-Mar-2020)
Filesystem at /dev/sda3 is mounted on /; on-line resizing required
old_desc_blocks = 4, new_desc_blocks = 4
The filesystem on /dev/sda3 is now 7732475 (4k) blocks long.
Checking the result:
# df -h
Filesystem      Size  Used Avail Use% Mounted on
tmpfs           394M  1.4M  392M   1% /run
/dev/sda3        29G  7.4G   21G  27% /
tmpfs           2.0G     0  2.0G   0% /dev/shm
tmpfs           5.0M     0  5.0M   0% /run/lock
tmpfs           4.0M     0  4.0M   0% /sys/fs/cgroup
/dev/sda2       512M  7.8M  505M   2% /boot/efi
tmpfs           394M   84K  394M   1% /run/user/126
tmpfs           394M   72K  394M   1% /run/user/1000
As you can see in Ubuntu 20 extend artition is not such a difficult task.
No need to reboot the server again. If you refresh your Cloudron dashboard and go to SYSTEM INFO, you will see the new disk space!
@humptydumpty This is a really good guide for those that need to expand when they run out of space, as a side note (but not to over explain cause this is a different topic??) LVM can be a easier in the long run and supports features like full-disk encryption.
If your VPS provider or home server supports it, extending an LVM disk is as simple as just adding another disk (or partition) to the group:
- Create (init) the new disk:
pvcreate /dev/sdX - Extend the LVM:
vgextend LVM_VG_NAME /dev/sdX(Find the LVM_VG_NAME withvgscommand) - Extend the LV virtual device:
lvextend -l +100%FREE /dev/VM_VG_NAME/root(Can be found withlvs - Resize new free space with fs of choice, resize2fs is usually used here:
resize2fs /dev/VM_VG_NAME/root
")
If you have the option to use LVM in the future, you should use it, allows you to just expand or add disks to a virtual (aka logical) volume for storage. Kind of like RAID.
--
https://urgero.org
~ Professional Nerd. Freelance Programmer. ~ - Create (init) the new disk:
-
@humptydumpty said in Ubuntu 20.04: How to Extend Partition (For Noobs):
how do you make code blocks have a darker background/box around them?
by using the super secret markdown code tag
@necrevistonnezr I did click on that and typed the code inside the tags but it doesn't change the look of it.
-
@humptydumpty This is a really good guide for those that need to expand when they run out of space, as a side note (but not to over explain cause this is a different topic??) LVM can be a easier in the long run and supports features like full-disk encryption.
If your VPS provider or home server supports it, extending an LVM disk is as simple as just adding another disk (or partition) to the group:
- Create (init) the new disk:
pvcreate /dev/sdX - Extend the LVM:
vgextend LVM_VG_NAME /dev/sdX(Find the LVM_VG_NAME withvgscommand) - Extend the LV virtual device:
lvextend -l +100%FREE /dev/VM_VG_NAME/root(Can be found withlvs - Resize new free space with fs of choice, resize2fs is usually used here:
resize2fs /dev/VM_VG_NAME/root
If you have the option to use LVM in the future, you should use it, allows you to just expand or add disks to a virtual (aka logical) volume for storage. Kind of like RAID.
- Create (init) the new disk:
-
@humptydumpty This is a really good guide for those that need to expand when they run out of space, as a side note (but not to over explain cause this is a different topic??) LVM can be a easier in the long run and supports features like full-disk encryption.
If your VPS provider or home server supports it, extending an LVM disk is as simple as just adding another disk (or partition) to the group:
- Create (init) the new disk:
pvcreate /dev/sdX - Extend the LVM:
vgextend LVM_VG_NAME /dev/sdX(Find the LVM_VG_NAME withvgscommand) - Extend the LV virtual device:
lvextend -l +100%FREE /dev/VM_VG_NAME/root(Can be found withlvs - Resize new free space with fs of choice, resize2fs is usually used here:
resize2fs /dev/VM_VG_NAME/root
If you have the option to use LVM in the future, you should use it, allows you to just expand or add disks to a virtual (aka logical) volume for storage. Kind of like RAID.
@murgero having issues with step 1 - sdX (not found).. which translates to sdX according to this screenshot?
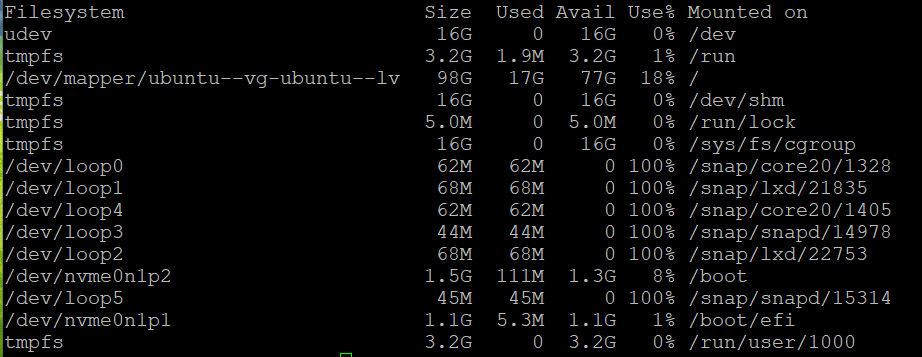
fdisk -l output:
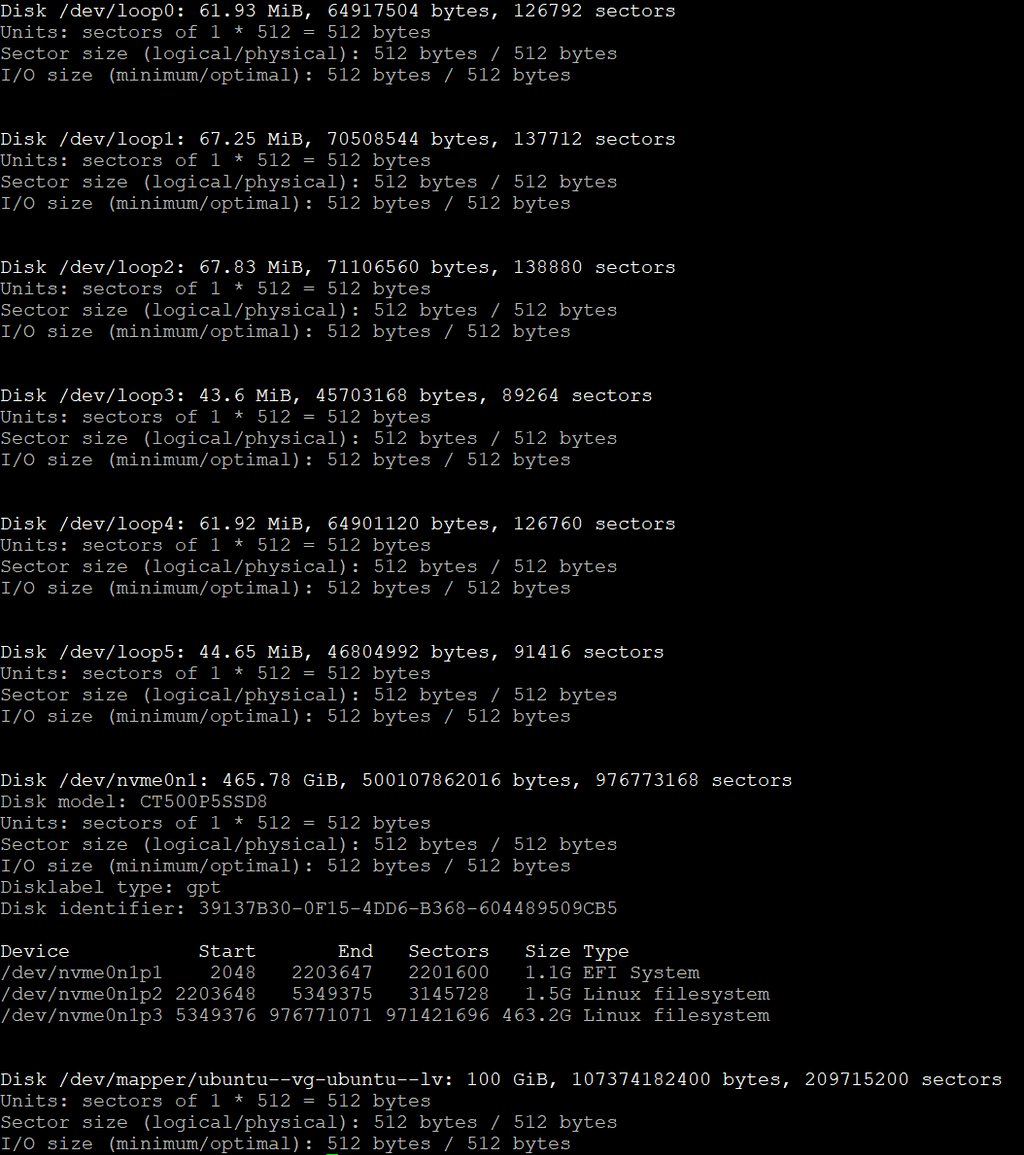
vgs output: ubuntu-vg
lvs output: ubuntu-lvI tried "pvcreate /dev/nvme0n1p3" and it said it needed -ff .... added that at the end and it said "can't open, mounted filesystem?"
Suggestions?
- Create (init) the new disk:
-
@murgero having issues with step 1 - sdX (not found).. which translates to sdX according to this screenshot?
fdisk -l output:
vgs output: ubuntu-vg
lvs output: ubuntu-lvI tried "pvcreate /dev/nvme0n1p3" and it said it needed -ff .... added that at the end and it said "can't open, mounted filesystem?"
Suggestions?
@humptydumpty
/dev/sdXwhere X is the drive letter (like sda. sdb, etc etc)However it looks like you have loop devices and nvme drives, in that case you will need to find what hasn't been added to the lvm and add it. Without seeing what you have, I can't say for sure what to add.
--
https://urgero.org
~ Professional Nerd. Freelance Programmer. ~ -
@humptydumpty
/dev/sdXwhere X is the drive letter (like sda. sdb, etc etc)However it looks like you have loop devices and nvme drives, in that case you will need to find what hasn't been added to the lvm and add it. Without seeing what you have, I can't say for sure what to add.
@murgero It's just a single M.2 NVME SSD but the Ubuntu server/Cloudron is only showing 100 out of 500GB. The rest is free space. Just to confirm I'm on the right path, I need to allocate the free space to the root partition, right?
BTW, why would Ubuntu only grab 100GB instead of all the available space on a fresh install? Did I mess up a setting somewhere?
-
 LVM resize solved
 Source: https://packetpushers.net/ubuntu-extend-your-default-lvm-space/
I didn't have to follow all that's in there so to keep it short, use these commands.
Run this first:
lvextend -l +100%FREE /dev/ubuntu-vg/ubuntu-lvNow, run this second command:
resize2fs /dev/mapper/ubuntu--vg-ubuntu--lvDone! Refresh your Cloudron dashboard and check stats page. No reboot needed.
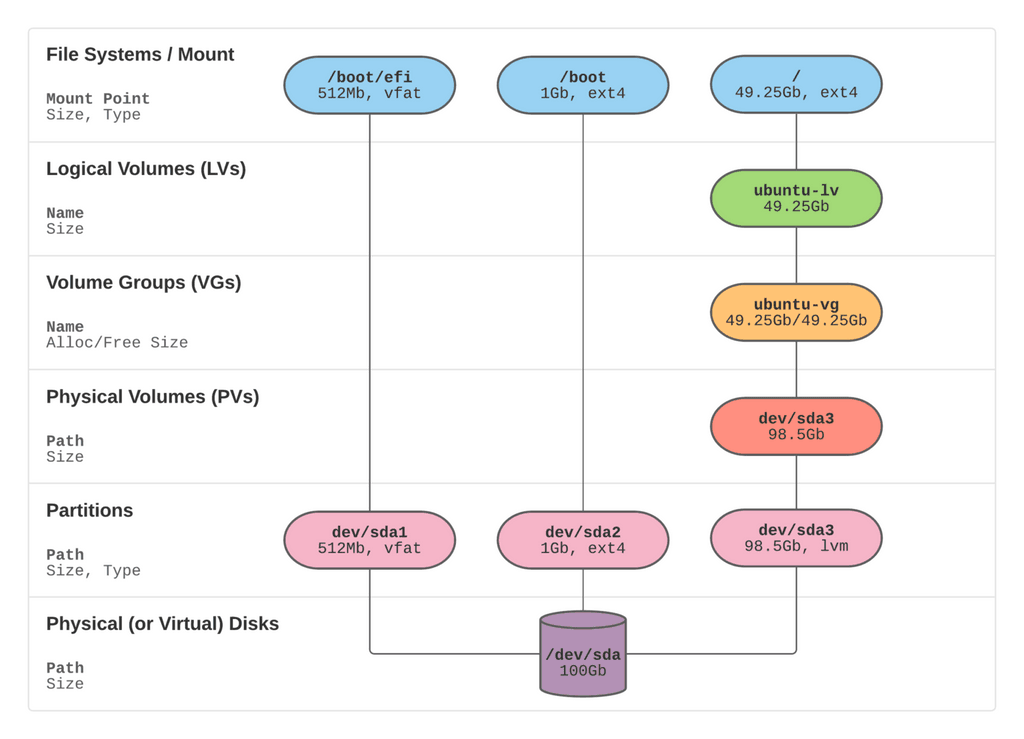
BTW, this diagram is great at showing how LVM works:
-
@murgero It's just a single M.2 NVME SSD but the Ubuntu server/Cloudron is only showing 100 out of 500GB. The rest is free space. Just to confirm I'm on the right path, I need to allocate the free space to the root partition, right?
BTW, why would Ubuntu only grab 100GB instead of all the available space on a fresh install? Did I mess up a setting somewhere?
-
 M murgero referenced this topic on
-
 H humpty referenced this topic on
-
H humpty referenced this topic on
-
H humpty referenced this topic on

Hello! It looks like you're interested in this conversation, but you don't have an account yet.
Getting fed up of having to scroll through the same posts each visit? When you register for an account, you'll always come back to exactly where you were before, and choose to be notified of new replies (either via email, or push notification). You'll also be able to save bookmarks and upvote posts to show your appreciation to other community members.
With your input, this post could be even better 💗
Register Login