[TUTORIAL] Building Cloudron Apps using Urgero.org's Ubuntu VM

-
How To Build Cloudron Apps In an Ubuntu Virtual Machine
How to build apps for Cloudron using VirtualBox (or VMWare Workstation, Hyper-V may or may not work here). This tutorial will follow the Cloudron Tutorial HOWEVER it will use a pre-built VM and some tweaks to building the app packages.
This will allow you to build apps on Mac and Windows without installing node, docker, etc. Edit: You can also use VirtualBox on Linux or just straight install docker, nodejs, and cloudron-cli to do the same
What Is Included In This VM?
- Docker
- Docker-compose (for Portainer)
- NodeJS & NPM
- Cloudron CLI
- Portainer (For managing Docker Easily)
Requirements
- Cloudron Server (Free Edition only allows 2 apps so keep that in mind!)
- Docker hub user account
- VirtualBox (And at least 2 Cores and 4GB RAM available for the VM) (VMWare Workstation should work also, but this tutorial will only cover VirutalBox.)
- My own pre-built VM that includes all the software and configuration needed to build apps (See link below!)
- Visual Studio Code (With Remote Development Pack installed.)
(Mega.nz was used as its a VERY fast download for free users. If mega does not work for you, PM me and we can P2P the OVA.)
Getting Started
- Go ahead and install VirtualBox with it's extensions. This is pretty simple to do, but in short go to https://www.virtualbox.org/ select "Download VirtualBox" and make sure you get the "Extensions" too (That's a separate download!)
- Download and install Virtual Studio Code. Make sure to install the Remote Dev Pack linked above as well!
- Download the VM linked above if you haven't already. There is no need to extract anything as the OVA file is self-contained.
Setup VirtualBox
Go into your downloads folder and double click the vbox-extension pack you downloaded from the getting started section. This will launch VirtualBox and ask if you want to install the extension. Click "Yes" and "I Accept".
Importing The VM
Open VirtualBox, then go to File -> Import Appliance. Select the OVA file you downloaded above. You should now see the details of the VM - you will be able to change settings after the import is done. So click "Next" and allow the import to finish.
Once the import is completed, you will see a new VM in VirtualBox called "Cloudron-DEV". You may modify the settings from this point, however I do recommend what I put in the config. Adding more resources never hurt though
")
As a note, under the Network config for the VM you will see 2 port forwards. Port 2222 (SSH) and port 9000 (Portainer). These ports will be used by us later in the tutorial. If you change the networking mode from NAT to Bridge so you can a local IP that matches your current LAN you will need to note that IP and use that instead of "localhost" later in the tutorial.
Setup Visual Studio Code
Open up Visual Studio Code and install Remote Development Extension. This will allow us to explore the VMs filesystem.
Let's Start the VM - To start, I recommend either just pressing "Start" or if you are a cool-cat you can headless start it (Right click the VM -> Start -> Headless Start") this will allow the VM to run in the background and will NOT produce a window for you to interact with. This will NOT persist across host reboots unless specially config'ed (not covered here!)
Open up PowerShell (Or terminal if on Mac) and let's SSH into the VM so we can change the default password (VERY IMPORTANT!) In the terminal type:
ssh dev@localhost -p 2222, accept the SSH certificate, then put in the password "password". Once logged in, typepasswd. Change your password following the prompts. Remember this password - it will be needed for VSCode later! (And for troubleshooting issues if any arise.) We also need to regenerate SSH Keys (For your own security!):sudo rm -v /etc/ssh/ssh_host_*sudo dpkg-reconfigure openssh-serversudo systemctl restart ssh
Now in Visual Studio Code, on the left bar, go to Remote Explorer, then make a new SSH Connection Target. Now VSCode will walk you through setup of the remote explorer. The first prompt is the host string, this is
dev@localhost -p 2222.(Please note the lower-case "p"!) Since we are using NAT as a simple config for the VM, ports are forwarded to the host for simplicity. In this case SSH is forwarded to port 2222. So, connecting to localhost port 2222 will actually be the Virtual Machine.Once saved, you will see a new ssh target "localhost" in VSCode. Right click on it, and select "Connect in current window". Give it a few seconds and it will prompt for your password. You may be prompted for other information here like the type of OS used - make sure to select Linux.
Great! Now you are connected to the VM. In the explorer tab in the left bar (Not remote explorer) it should say "Connected to remote". Now, we need to click the button that says "Open folder". A prompt will come up asking which folder to open. I would just press "OK" and let it open
/home/devas that is the home dir for the dev user and you have full permissions there as that user. Put your password in once more and now you should see a small folder structure and EXAMPLE app "tutorial-php-app".You should note, a terminal can also be opened by going to the Terminal menu -> New Terminal. This gives you ssh access to a text terminal on the server to run commands (like building an app!)
Building Your First App
Let's open up a terminal by going to the Terminal menu -> New Terminal. This will open at the bottom of VSCode. Let's login to the cloudron instance of choice and docker hub:
cloudron loginand follow the prompts.docker loginand follow the prompts.
Once logged into the above, you can start building and deploying apps on your cloudron instance! Explore the tutorial php app (you can git clone more into the VM too, just put the app folders in separate repos.)
The build process is pretty simple:
cd path-to-appdocker build -t <dockerHubUsername>/<packageName>:latest . --no-cache(Note, the rogue looking period is short for "current directory" and docker will use the current directory to build the container.
Example:docker build -t murgero/org.urgero.someApp:latest . --no-cachedocker push <dockerHubUsername>/<packageName>:latest
Example:docker push murgero/org.urgero.someApp:latestcloudron install --image=<dockerHubUsername>/<packageName>:latest
Example:cloudron install --image=murgero/org.urgero.someApp:latest
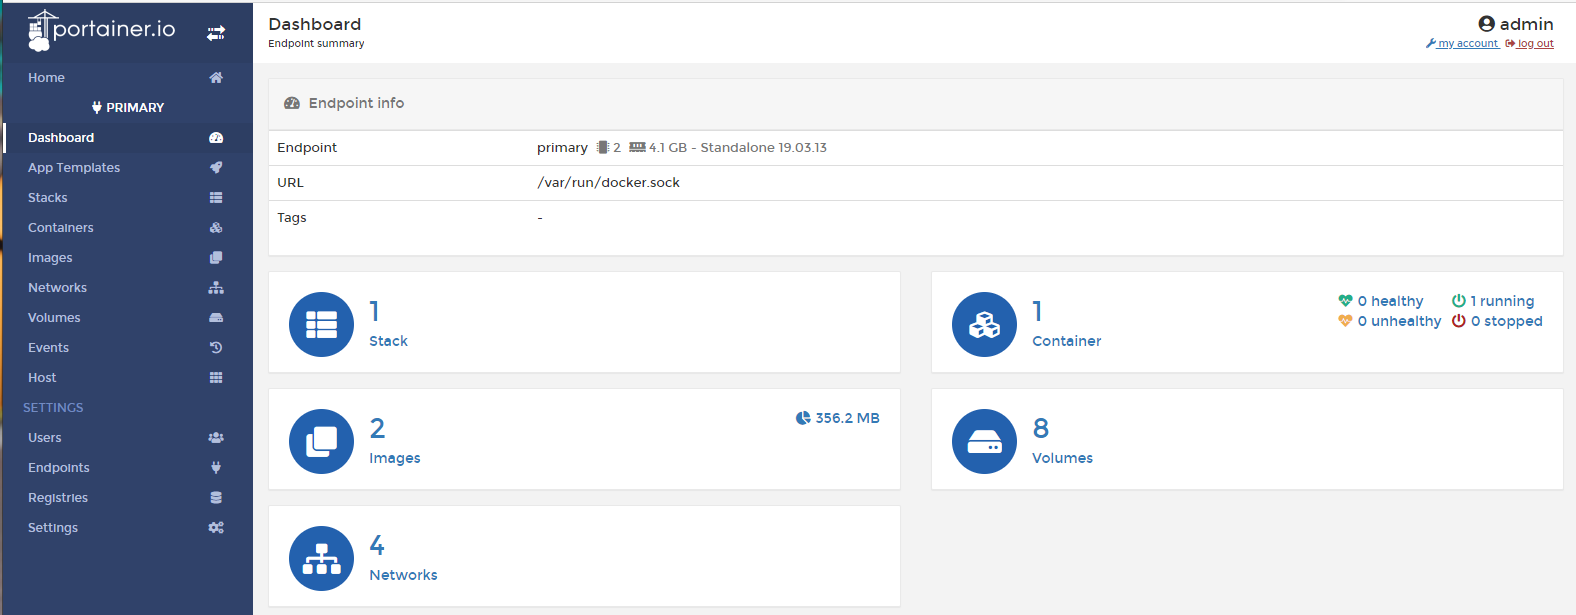
Portainer
Portainer is available to assist in cleaning the VM of docker images and pulling images and spinning up docker containers as well. It's a WebUI for Docker essentially. It's running by default.
Open your browser to http://localhost:9000. It will run the the setup - other than the password, I would just choose defaults here.
Special Notes
- Portainer is on port 9000 regardless of NAT or Bridge Network config in the VM.
- SSH is on port localhost:2222 or IP:22 depending on Network config (default is 2222.)
- VSCode will allow you to connect to the VM over SSH and configure, build, and even develop new apps for Cloudron. This VM is mainly here to build the app with docker and also give you access to cloudron CLI.
- The VM does NOT include a way to run the cloudron app however.
- The VM does NOT include PHP, build-essentials, or other since all that would run in the docker container you are building.
- The VM is NOT tested for security but if you change the default passwords when asked above you should be fine on local networks.
- The VM is updated to latest packages as of the writing of the post and you should
apt update && apt upgrade -yevery week or so to get the latest security patches.
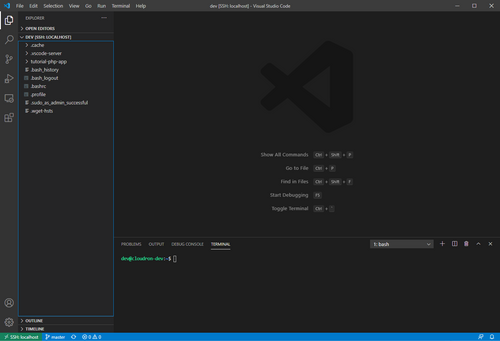
Screenshot of The Final Connection:
This is what it all looks like once you complete the above steps, you will get a file explorer and ssh terminal along with a code-editor to modify and build cloudron apps! Portainer as well for managing the docker daemon (mainly for cleaning up easily)
-
Amazing work - the world thanks you!

Web Design & Development: https://www.evergreen.je
Technology & Apps: https://www.marcusquinn.com -
Amazing work - the world thanks you!
-
this looks like something i could get my hands at... hopefully

-
Nice work @murgero !
One sticky point is that the only correct way to capitalize VMware is without a capital 'w'. (used to work there, and many there didn't figure this out ;-/)
This is exactly what I was asking for in the RChat last year, but in container form.
This can all be done in a container, so it could all run as a Cloudron App itself and be kept up to date. No need for the entire OS. No need for VMware or V-box.

Great progress towards this dream!
-
Ah this is really nice! @murgero maybe we can actually polish that a bit further and put it directly as an option into our docs?
On a side note, if nodejs can be installed on the developer machine, then one can also use our cloudron buildbot app, installed on a Cloudron itself, to avoid the local docker installation as well as usually pushing the resulting images from a VPS is a magnitude faster then from a residential connection. But as said, I think both options would be great to have better documented in a tutorial style like you did
")
-
Ah this is really nice! @murgero maybe we can actually polish that a bit further and put it directly as an option into our docs?
On a side note, if nodejs can be installed on the developer machine, then one can also use our cloudron buildbot app, installed on a Cloudron itself, to avoid the local docker installation as well as usually pushing the resulting images from a VPS is a magnitude faster then from a residential connection. But as said, I think both options would be great to have better documented in a tutorial style like you did
@nebulon Yeah, I wrote this pretty exhausted. That said I could probably rewrite it sometime in the coming weeks. Basically, I made the VM because it's what I use to develop apps for Cloudron - and the OVA is nice cause I rebuild my computer every so often and kinda tired of rebuilding it over and over again. Figured if I did this, and wrote a quick tutorial on it, it could benefit everyone
-
@murgero Hey this was a really cool project to simplify things for others. I see its 2 years old already and the mega link is down but you provided a good template to replicate your setup. Thanks!
Hello! It looks like you're interested in this conversation, but you don't have an account yet.
Getting fed up of having to scroll through the same posts each visit? When you register for an account, you'll always come back to exactly where you were before, and choose to be notified of new replies (either via email, or push notification). You'll also be able to save bookmarks and upvote posts to show your appreciation to other community members.
With your input, this post could be even better 💗
Register Login