Beginner's Guide: Hugo + Gitlab CI + Surfer


-
There are different approaches to this. This is one way based on another Hugo CMS post here -- I hope it helps someone!
On your local machine, you'll need to install first:
- Git (https://git-scm.com/downloads)
- Hugo (https://gohugo.io/getting-started/installing/)
- Yes, and create a GitLab account!
Note: You will need to use a Cloudron or other self hosted gitlab instance. The Surfer and GitLab apps are both available on Cloudron. You would need to host your own gitlab-runner for this to work.
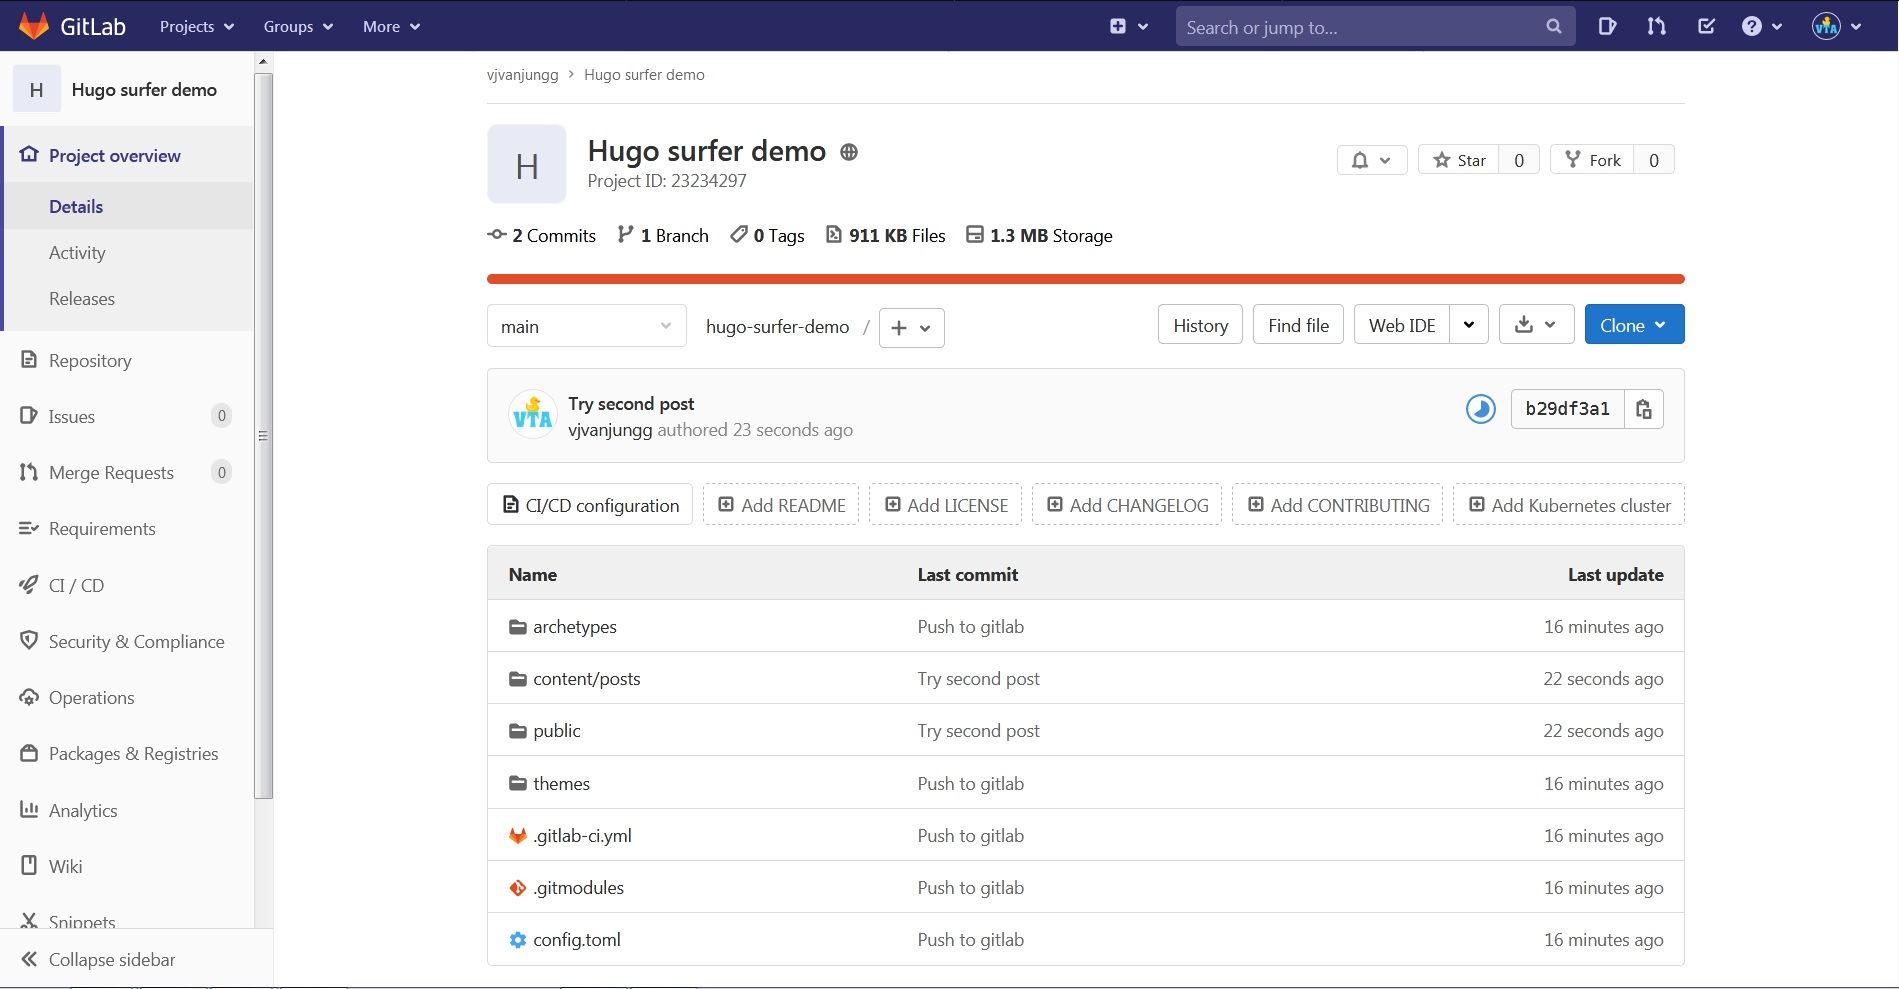
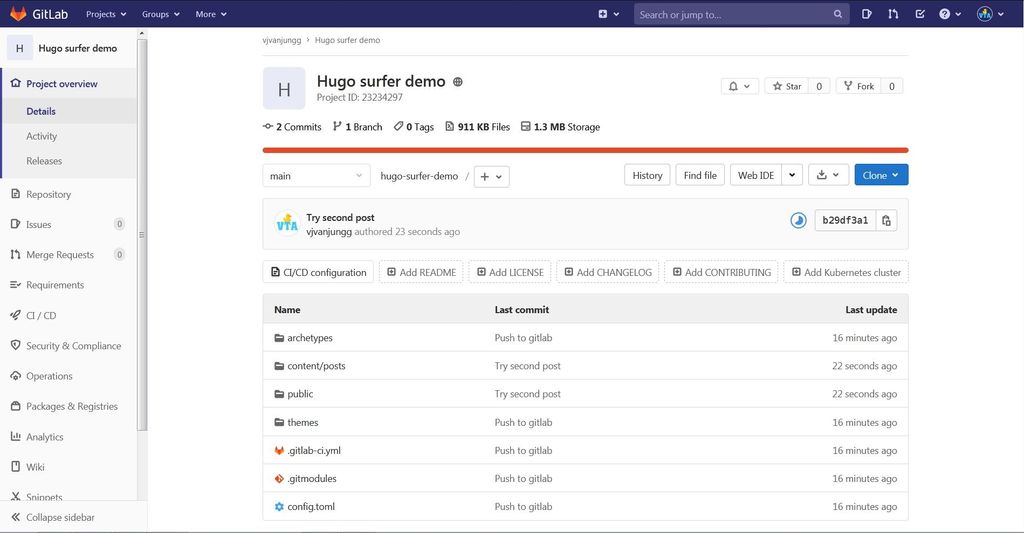
After creating a GitLab account, you can log in to create a Blank project like this:
It should look like this after the project has been created:

To verify your Git & Hugo install on the local machine, you can run in your Mac Terminal/Windows cmd:
git --version
hugo version
From here we can begin the fun part. All the commands needed are below. I have taken the screenshots of command by command.
You can copy/paste and hit Enter/Return in your Terminal for each one to run and see the results.
Remember to change the link to your GitLab project in the line beginning with git remote add below. We start with this line:
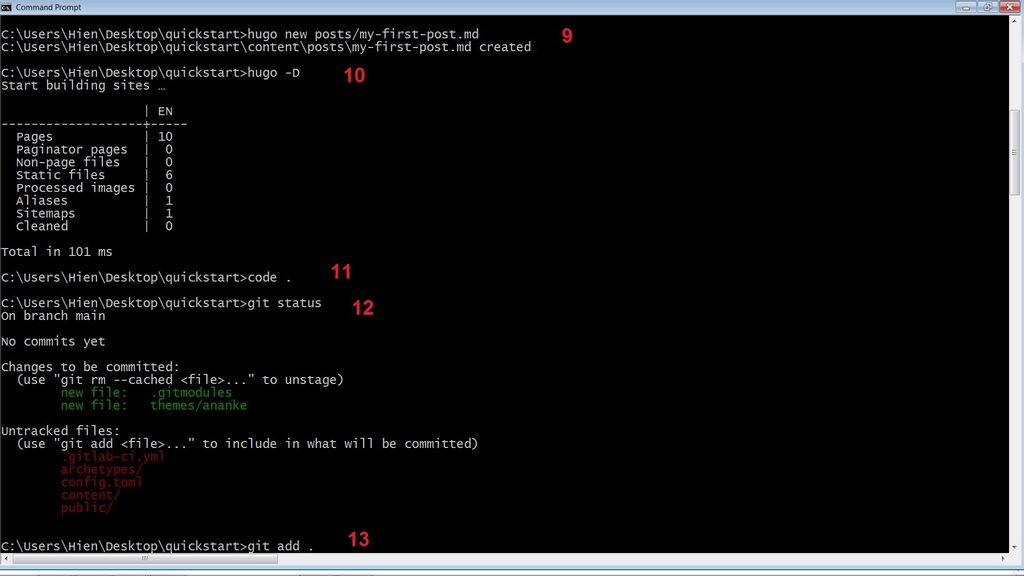
hugo new site quickstart
cd quickstart
git init
git remote add origin https://gitlab.com/vjvanjungg/hugo-surfer-demo.git
git submodule add https://github.com/budparr/gohugo-theme-ananke.git themes/ananke
echo theme = "ananke" >> config.toml
hugo new posts/my-first-post.md
hugo -D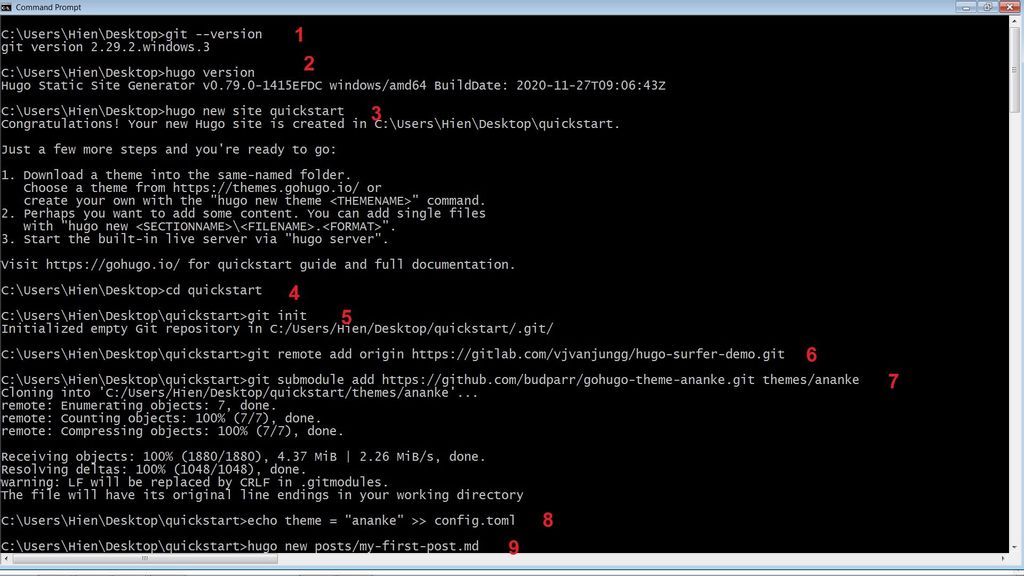
Then, at command #11 if you're using Visual Studio Code or any other code editor you like, open it up to add a new file called .gitlab-ci.yml:
Adding .gitlab-ci.yml:
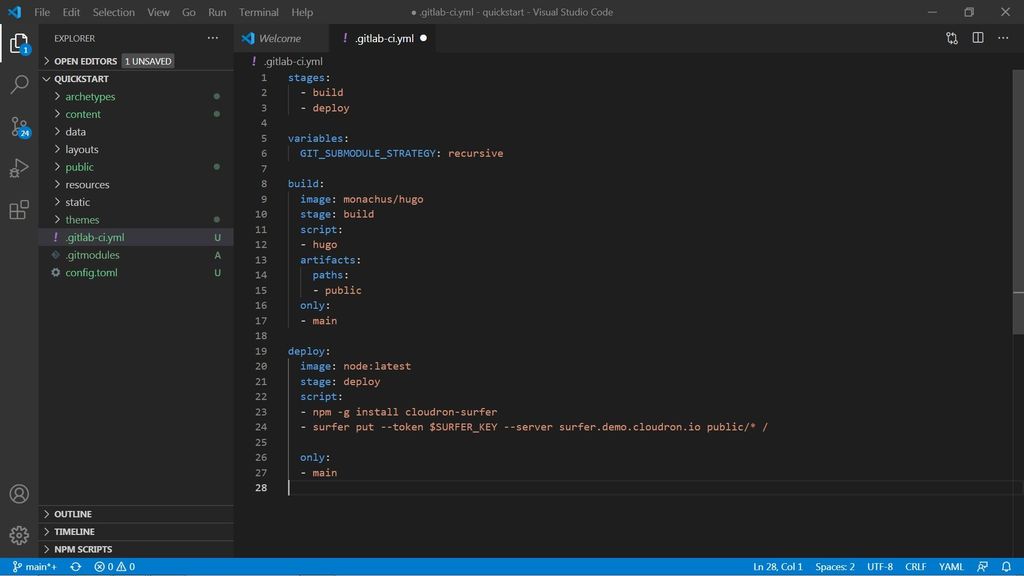
The content of the file .gitlab-ci.yml is as follows. If you're hosting Surfer at a different url, remember to change it from surfer.demo.cloudron.io below to your url.
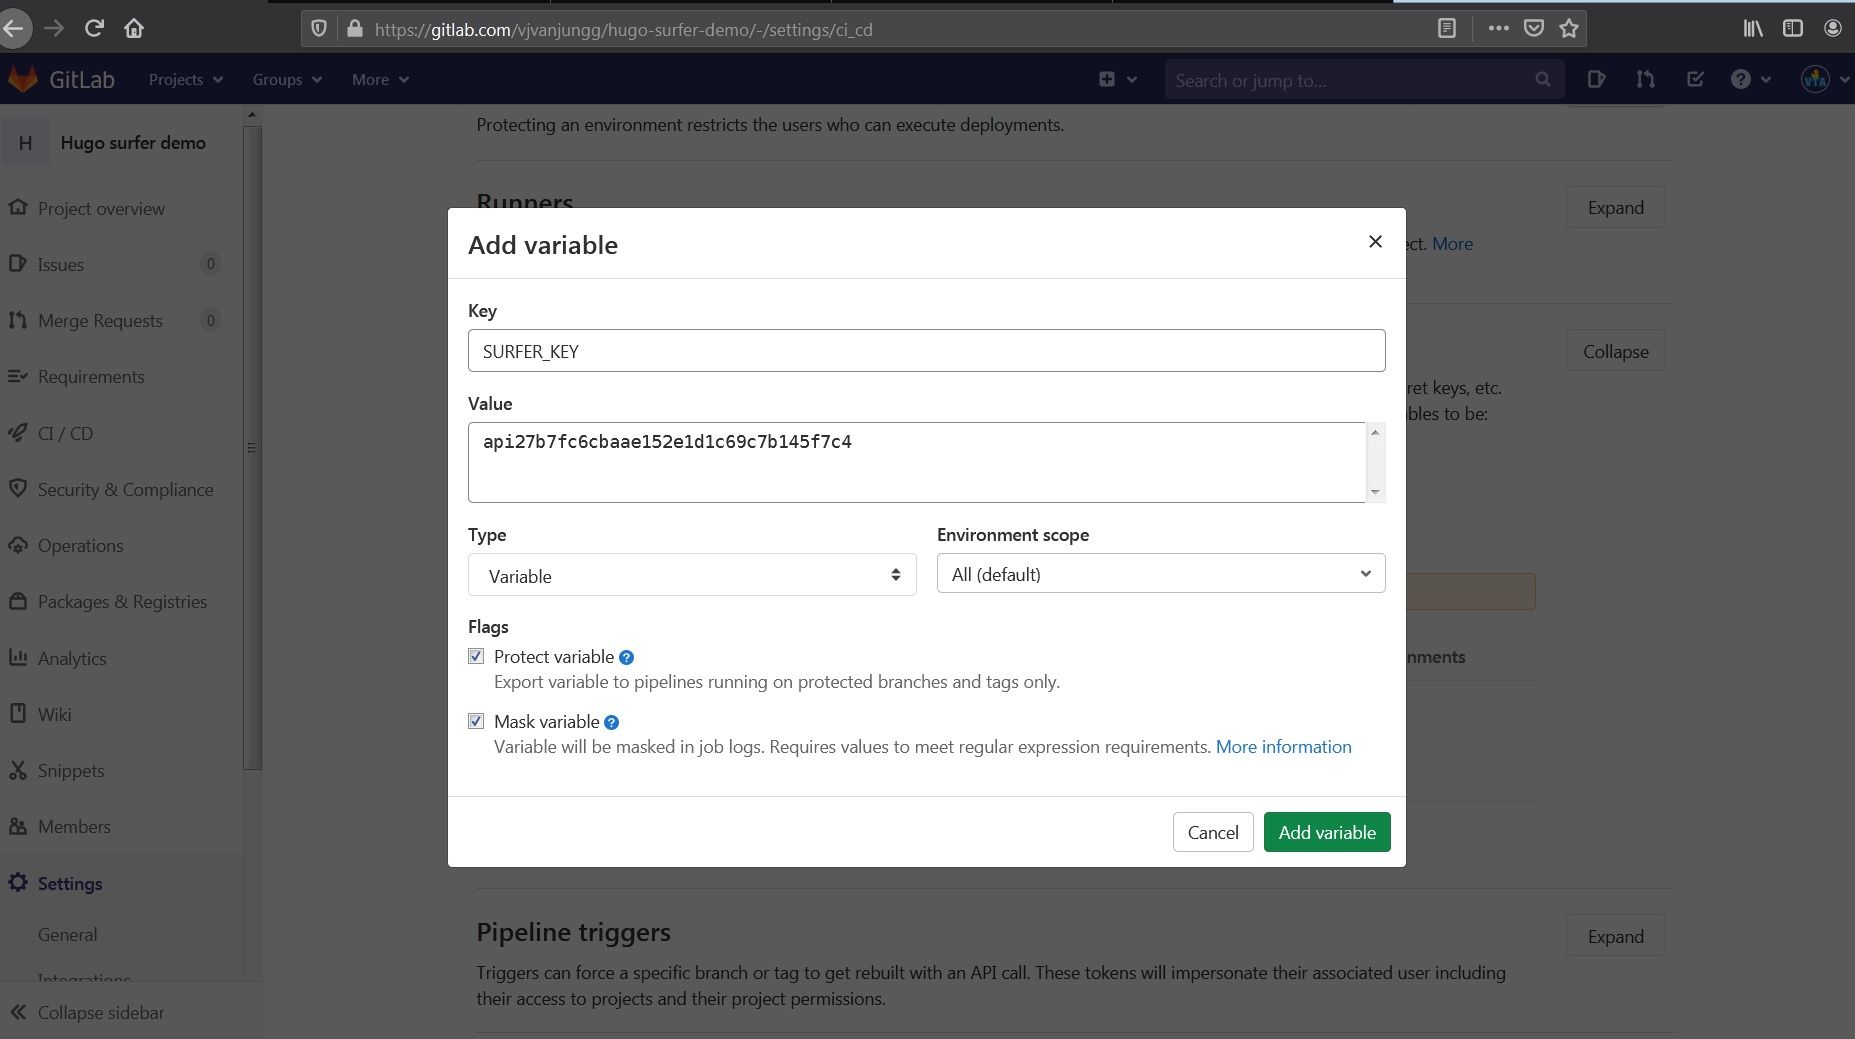
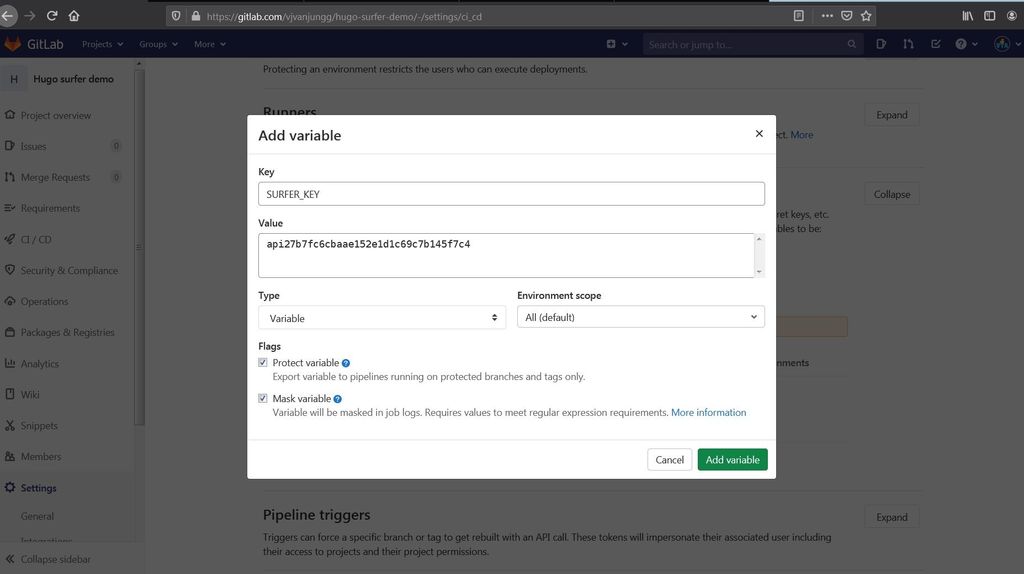
stages:
  - build
  - deploy

variables:
  GIT_SUBMODULE_STRATEGY: recursive

build:
  image: monachus/hugo
  stage: build
  script:
  - hugo
  artifacts:
    paths:
    - public
  only:
  - main

deploy:
  image: node:latest
  stage: deploy
  script:
  - npm -g install cloudron-surfer
  - surfer put --token $SURFER_KEY --server surfer.demo.cloudron.io public/* /

  only:
  - main
After this, get the access token from Surfer:
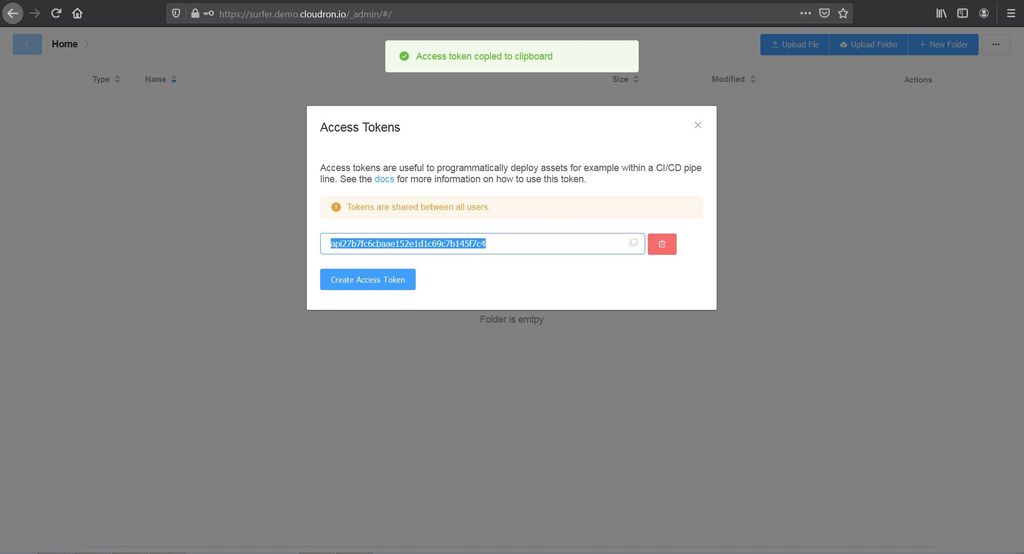
Then, go to your GitLab project --> Settings --> CI / CD. Find the Variables section and click Add Variable:
And all you need now is to run the rest of the commands, they are:
git status # just to see the file status not 100% necessary
git add . # the dot means add everything
git commit -m "Push to gitlab" # commit with any note/message you like
git push -u origin main # push local files to remote GitLab project
When you first do git push on your computer, you may be asked to enter your GitLab credentials. And voila, you're done!!
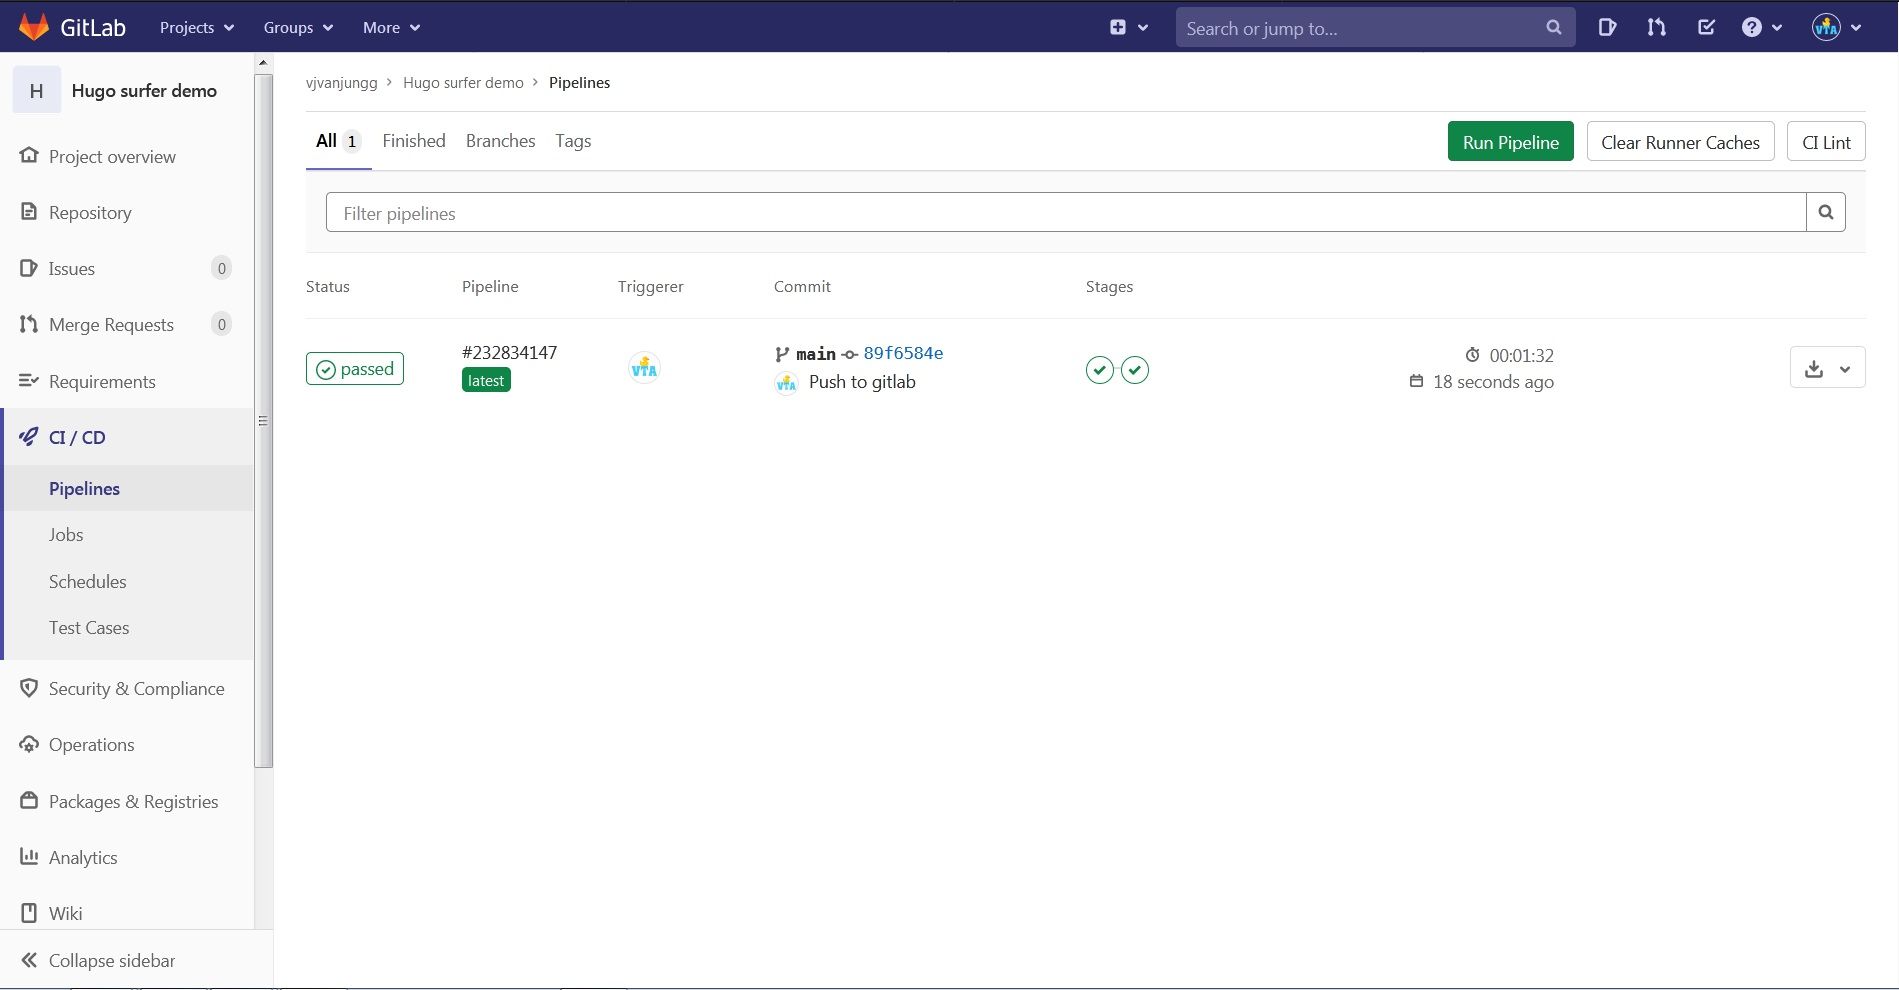
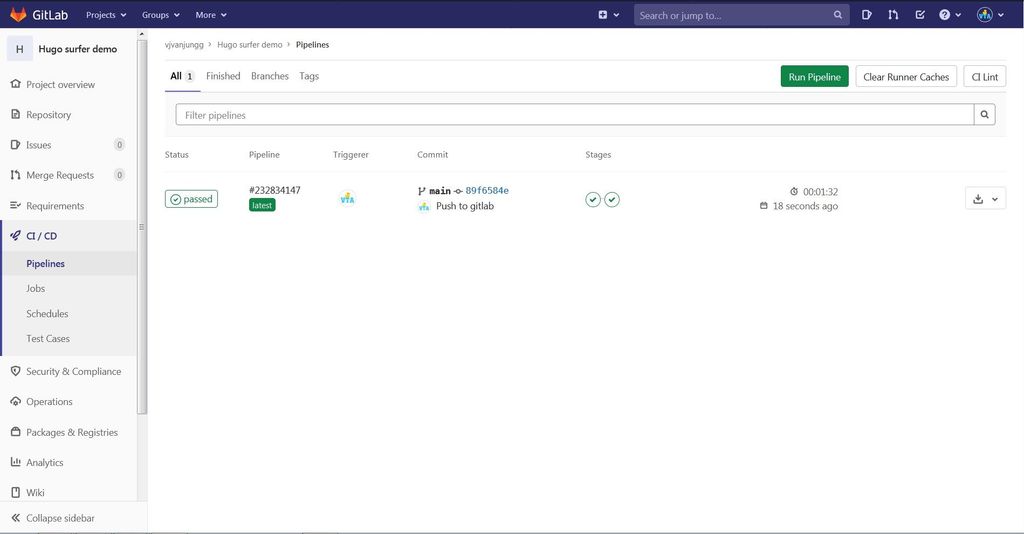
After git push, you can see the magic happens in GitLab. The blue clock means the pipeline is running.
After it succeeds, it will show:
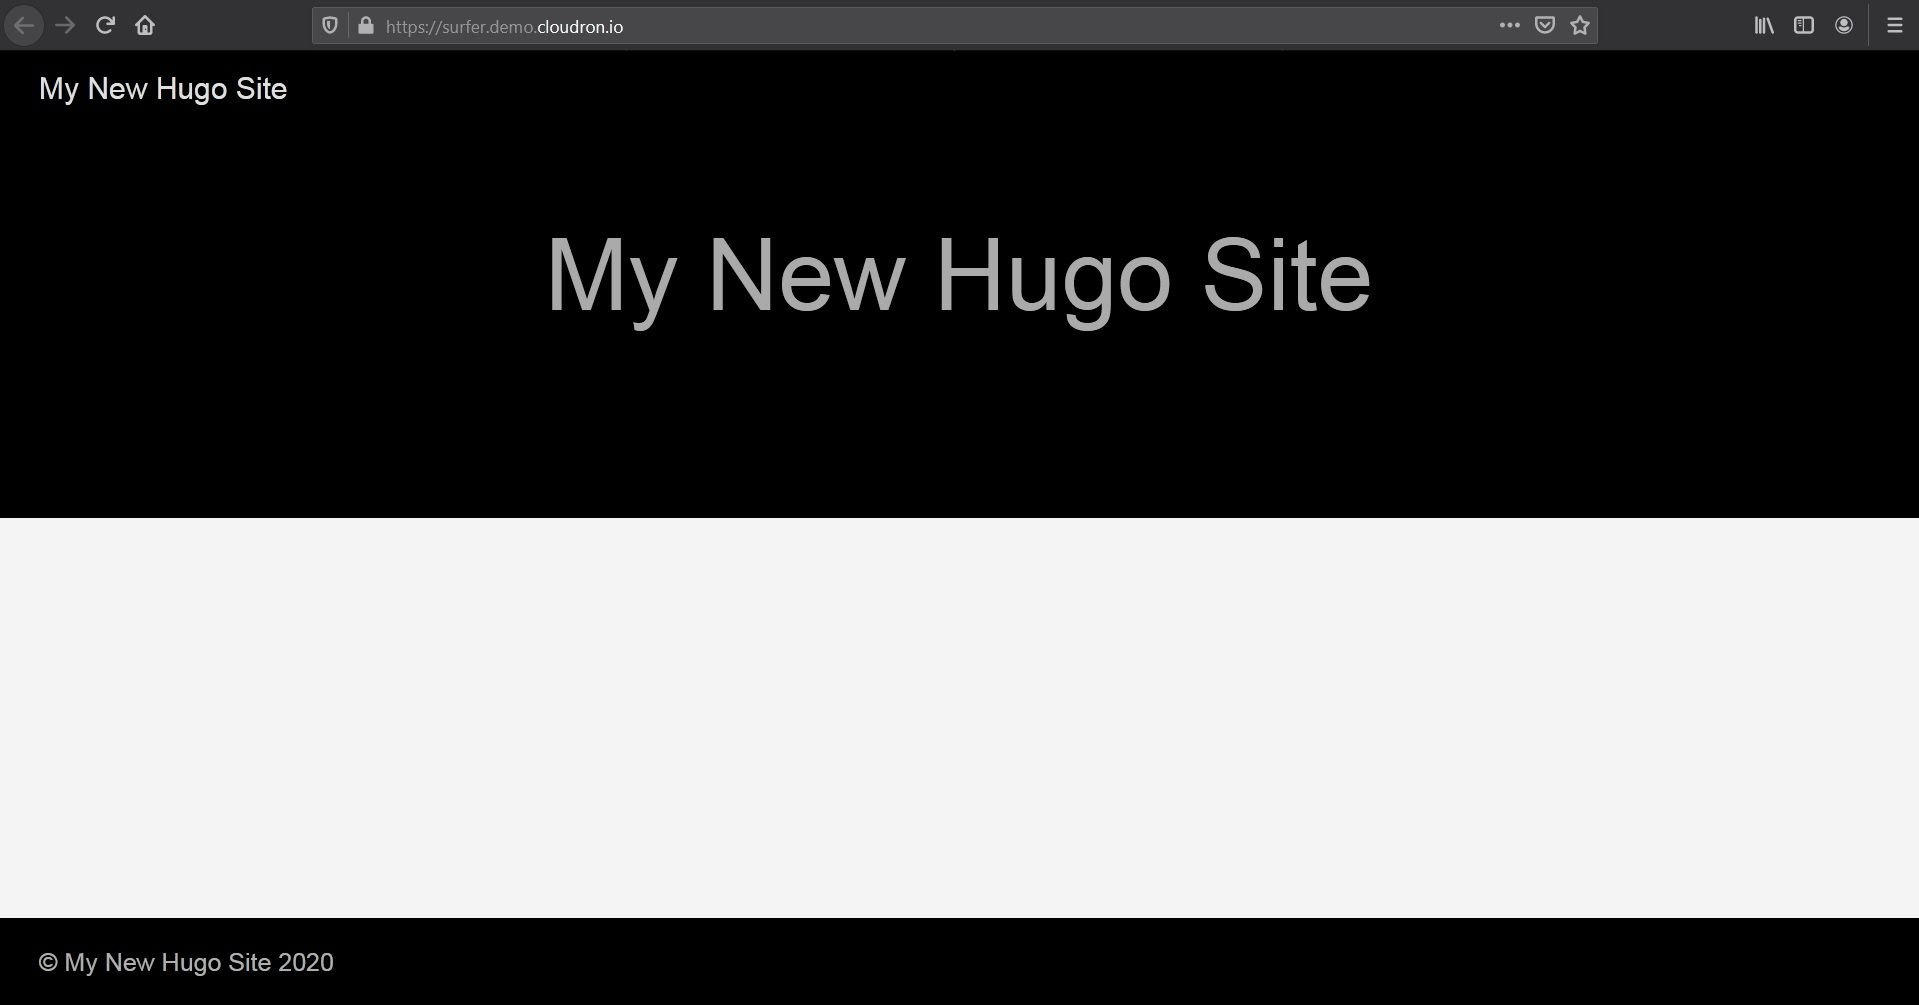
Navigate to your Surfer url, and enjoy your new site!

 I hope it helps! This is the least I can do for a wonderful community that has helped me so much.
 -
There are different approaches to this. This is one way based on another Hugo CMS post here -- I hope it helps someone!
On your local machine, you'll need to install first:
- Git (https://git-scm.com/downloads)
- Hugo (https://gohugo.io/getting-started/installing/)
- Yes, and create a GitLab account!
Note: You will need to use a Cloudron or other self hosted gitlab instance. The Surfer and GitLab apps are both available on Cloudron. You would need to host your own gitlab-runner for this to work.
After creating a GitLab account, you can log in to create a Blank project like this:
It should look like this after the project has been created:
To verify your Git & Hugo install on the local machine, you can run in your Mac Terminal/Windows cmd:
git --version
hugo version
From here we can begin the fun part. All the commands needed are below. I have taken the screenshots of command by command.
You can copy/paste and hit Enter/Return in your Terminal for each one to run and see the results.
Remember to change the link to your GitLab project in the line beginning with git remote add below. We start with this line:
hugo new site quickstart
cd quickstart
git init
git remote add origin https://gitlab.com/vjvanjungg/hugo-surfer-demo.git
git submodule add https://github.com/budparr/gohugo-theme-ananke.git themes/ananke
echo theme = "ananke" >> config.toml
hugo new posts/my-first-post.md
hugo -D
Then, at command #11 if you're using Visual Studio Code or any other code editor you like, open it up to add a new file called .gitlab-ci.yml:
Adding .gitlab-ci.yml:
The content of the file .gitlab-ci.yml is as follows. If you're hosting Surfer at a different url, remember to change it from surfer.demo.cloudron.io below to your url.
stages:
  - build
  - deploy

variables:
  GIT_SUBMODULE_STRATEGY: recursive

build:
  image: monachus/hugo
  stage: build
  script:
  - hugo
  artifacts:
    paths:
    - public
  only:
  - main

deploy:
  image: node:latest
  stage: deploy
  script:
  - npm -g install cloudron-surfer
  - surfer put --token $SURFER_KEY --server surfer.demo.cloudron.io public/* /

  only:
  - main
After this, get the access token from Surfer:
Then, go to your GitLab project --> Settings --> CI / CD. Find the Variables section and click Add Variable:
And all you need now is to run the rest of the commands, they are:
git status # just to see the file status not 100% necessary
git add . # the dot means add everything
git commit -m "Push to gitlab" # commit with any note/message you like
git push -u origin main # push local files to remote GitLab project
When you first do git push on your computer, you may be asked to enter your GitLab credentials. And voila, you're done!!
After git push, you can see the magic happens in GitLab. The blue clock means the pipeline is running.
After it succeeds, it will show:
Navigate to your Surfer url, and enjoy your new site!
I hope it helps! This is the least I can do for a wonderful community that has helped me so much. -
@vjvanjungg very nice, concise and crisp reading! Don't you need to setup a build server for the gitlab pipeline to work? Or did I miss that part in the tutorial?
@girish thanks, we’re just letting the gitlab ci do the work, that’s how i understand it now. if that what u mean be build server, enlighten me otherwise
-
There are different approaches to this. This is one way based on another Hugo CMS post here -- I hope it helps someone!
On your local machine, you'll need to install first:
- Git (https://git-scm.com/downloads)
- Hugo (https://gohugo.io/getting-started/installing/)
- Yes, and create a GitLab account!
Note: You will need to use a Cloudron or other self hosted gitlab instance. The Surfer and GitLab apps are both available on Cloudron. You would need to host your own gitlab-runner for this to work.
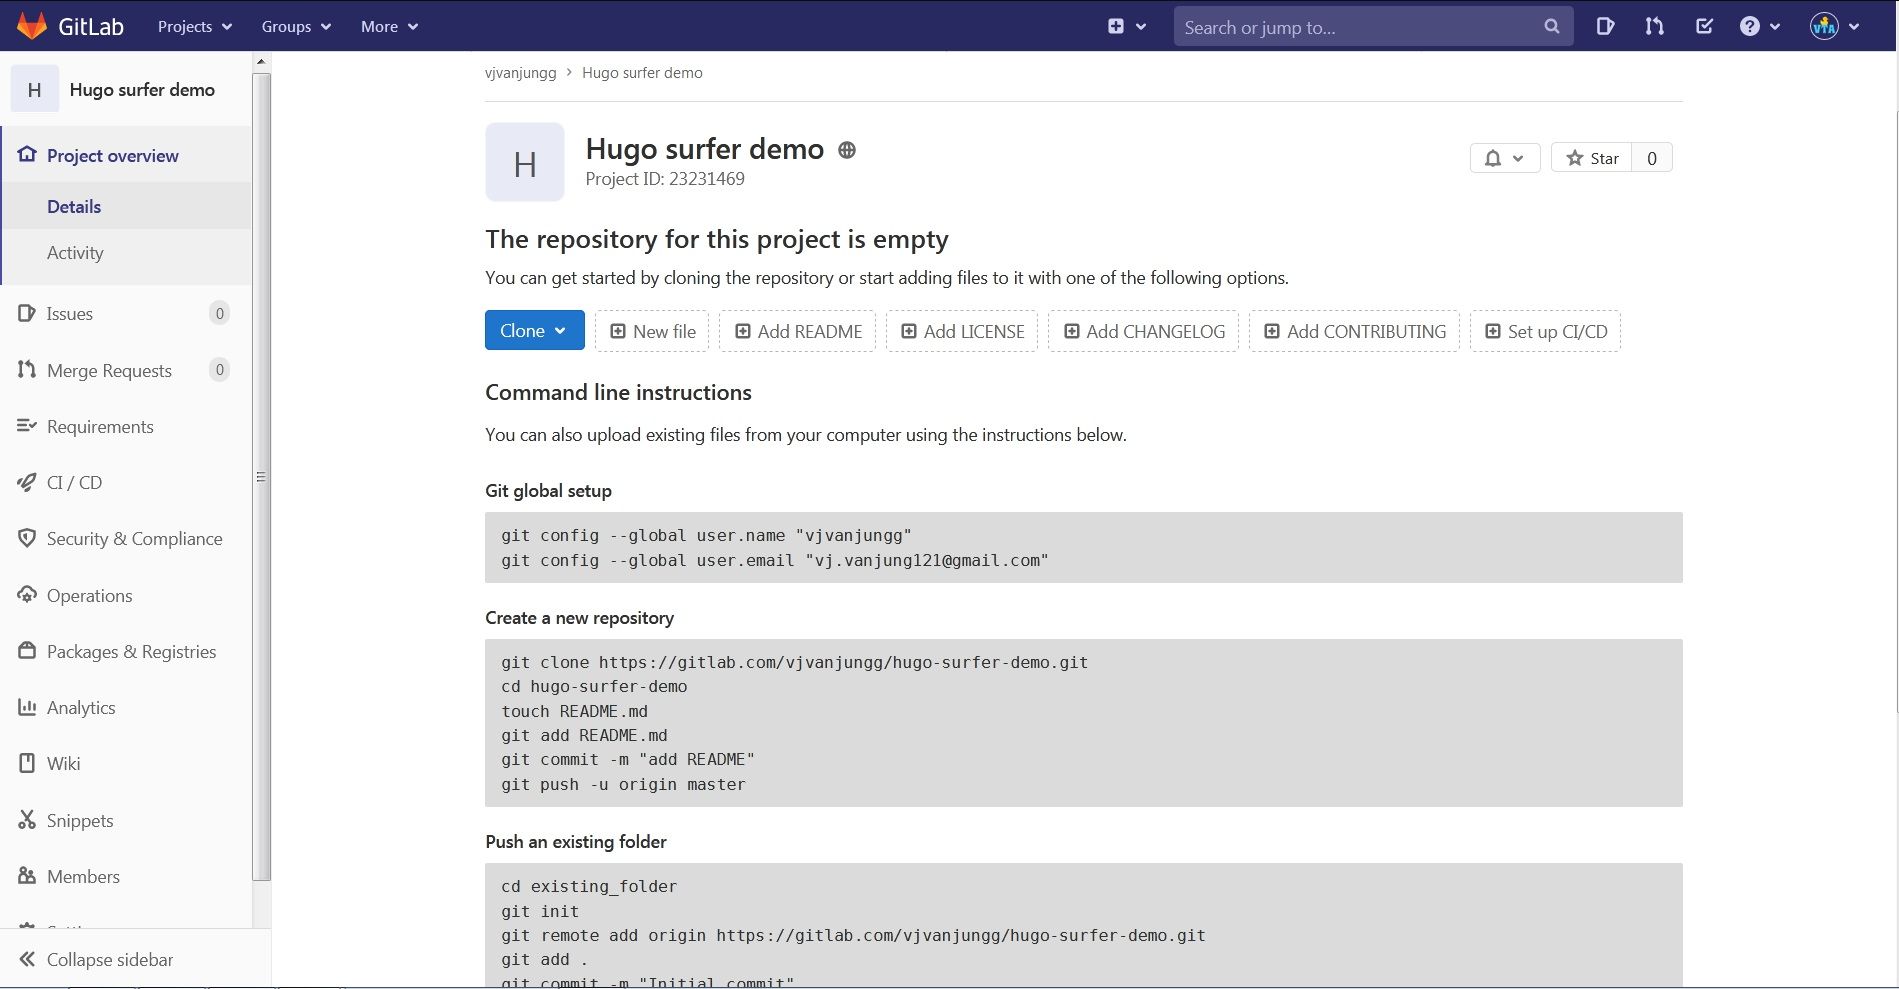
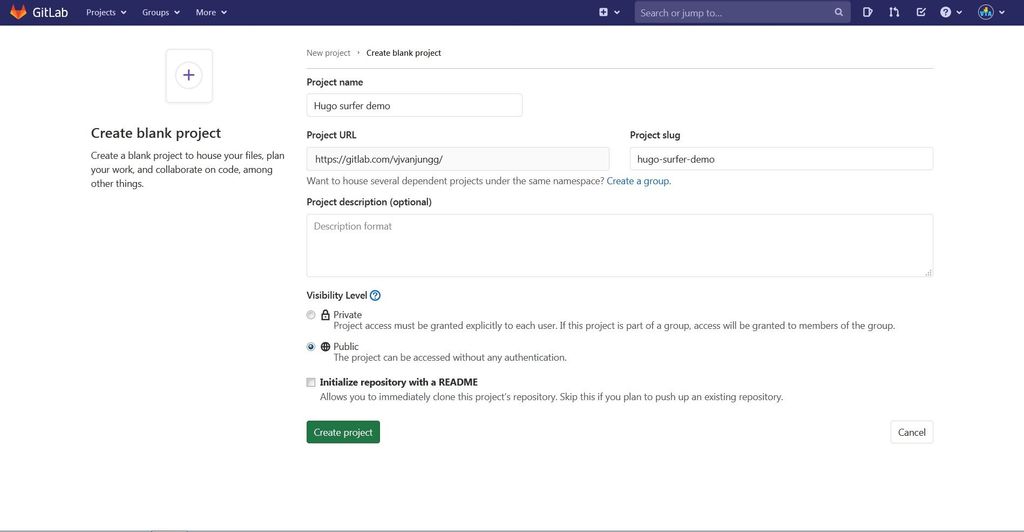
After creating a GitLab account, you can log in to create a Blank project like this:
It should look like this after the project has been created:
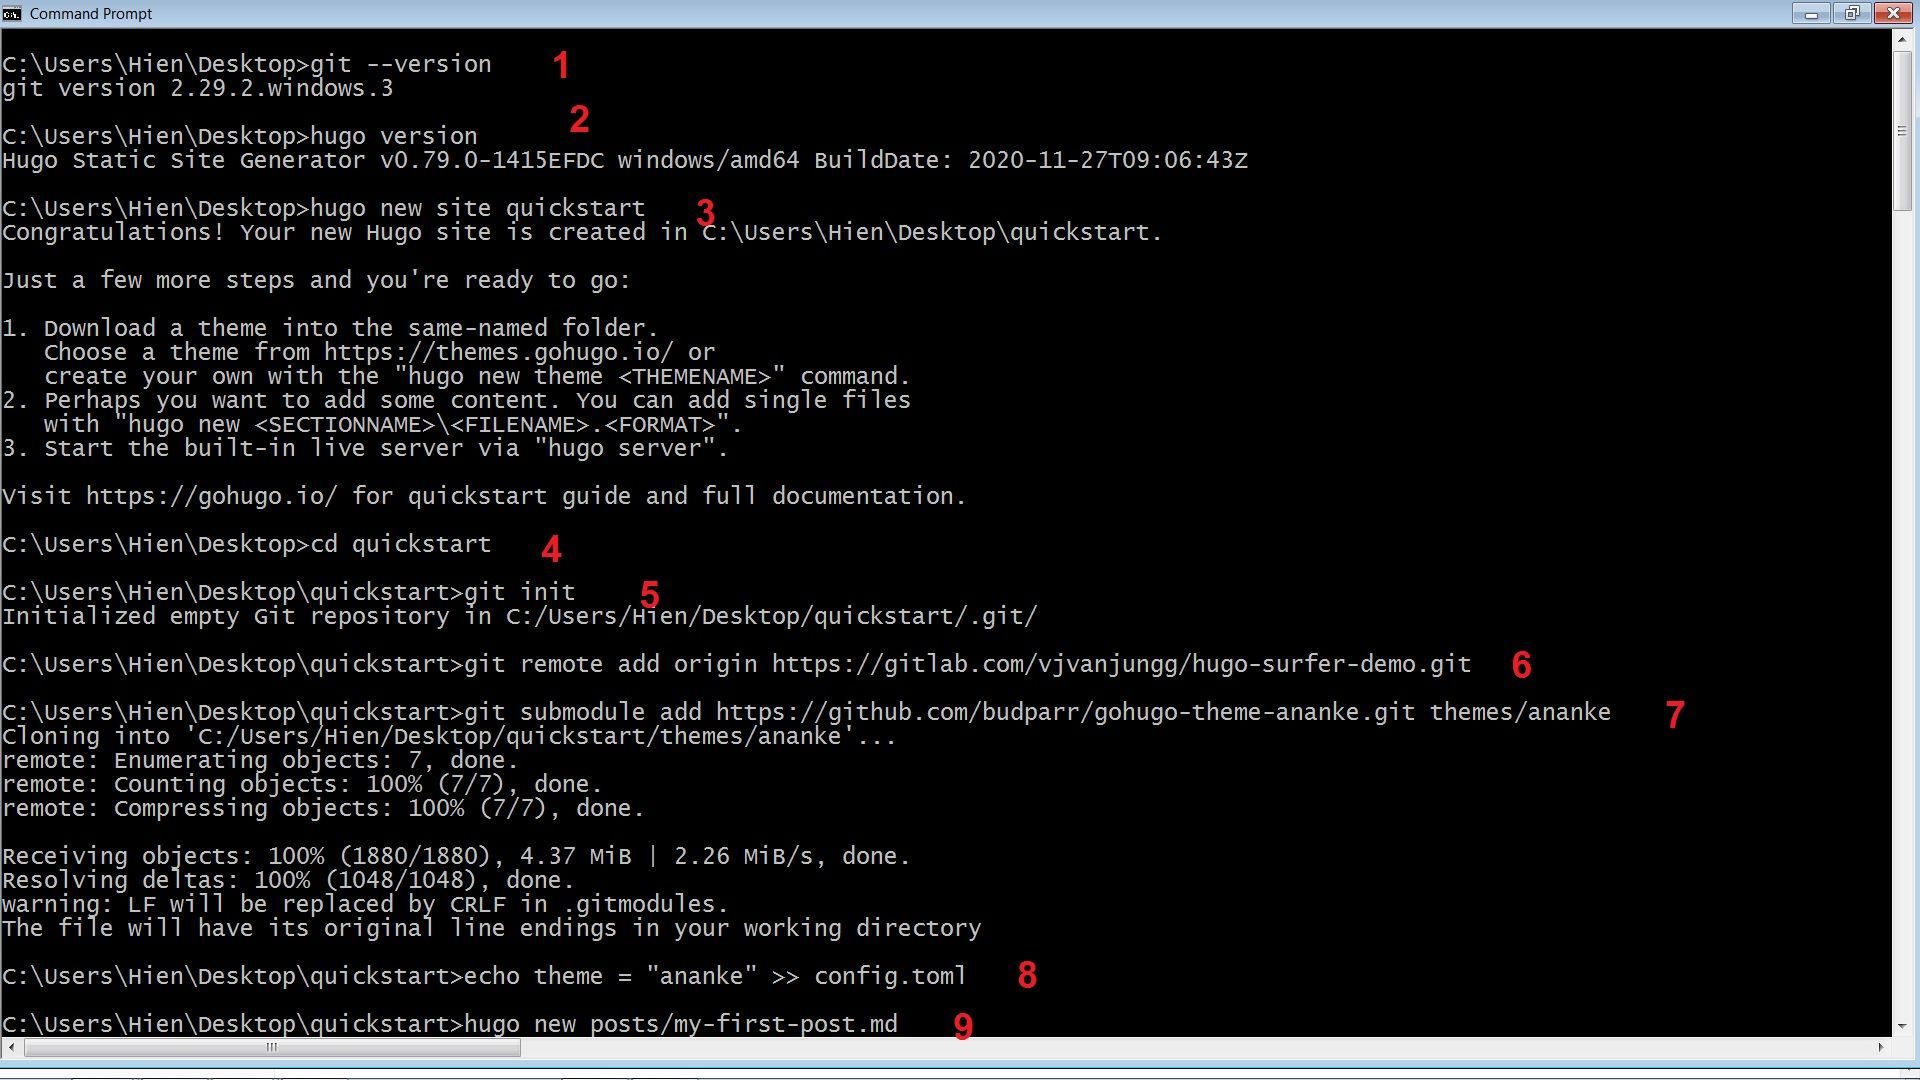
To verify your Git & Hugo install on the local machine, you can run in your Mac Terminal/Windows cmd:
git --version
hugo version
From here we can begin the fun part. All the commands needed are below. I have taken the screenshots of command by command.
You can copy/paste and hit Enter/Return in your Terminal for each one to run and see the results.
Remember to change the link to your GitLab project in the line beginning with git remote add below. We start with this line:
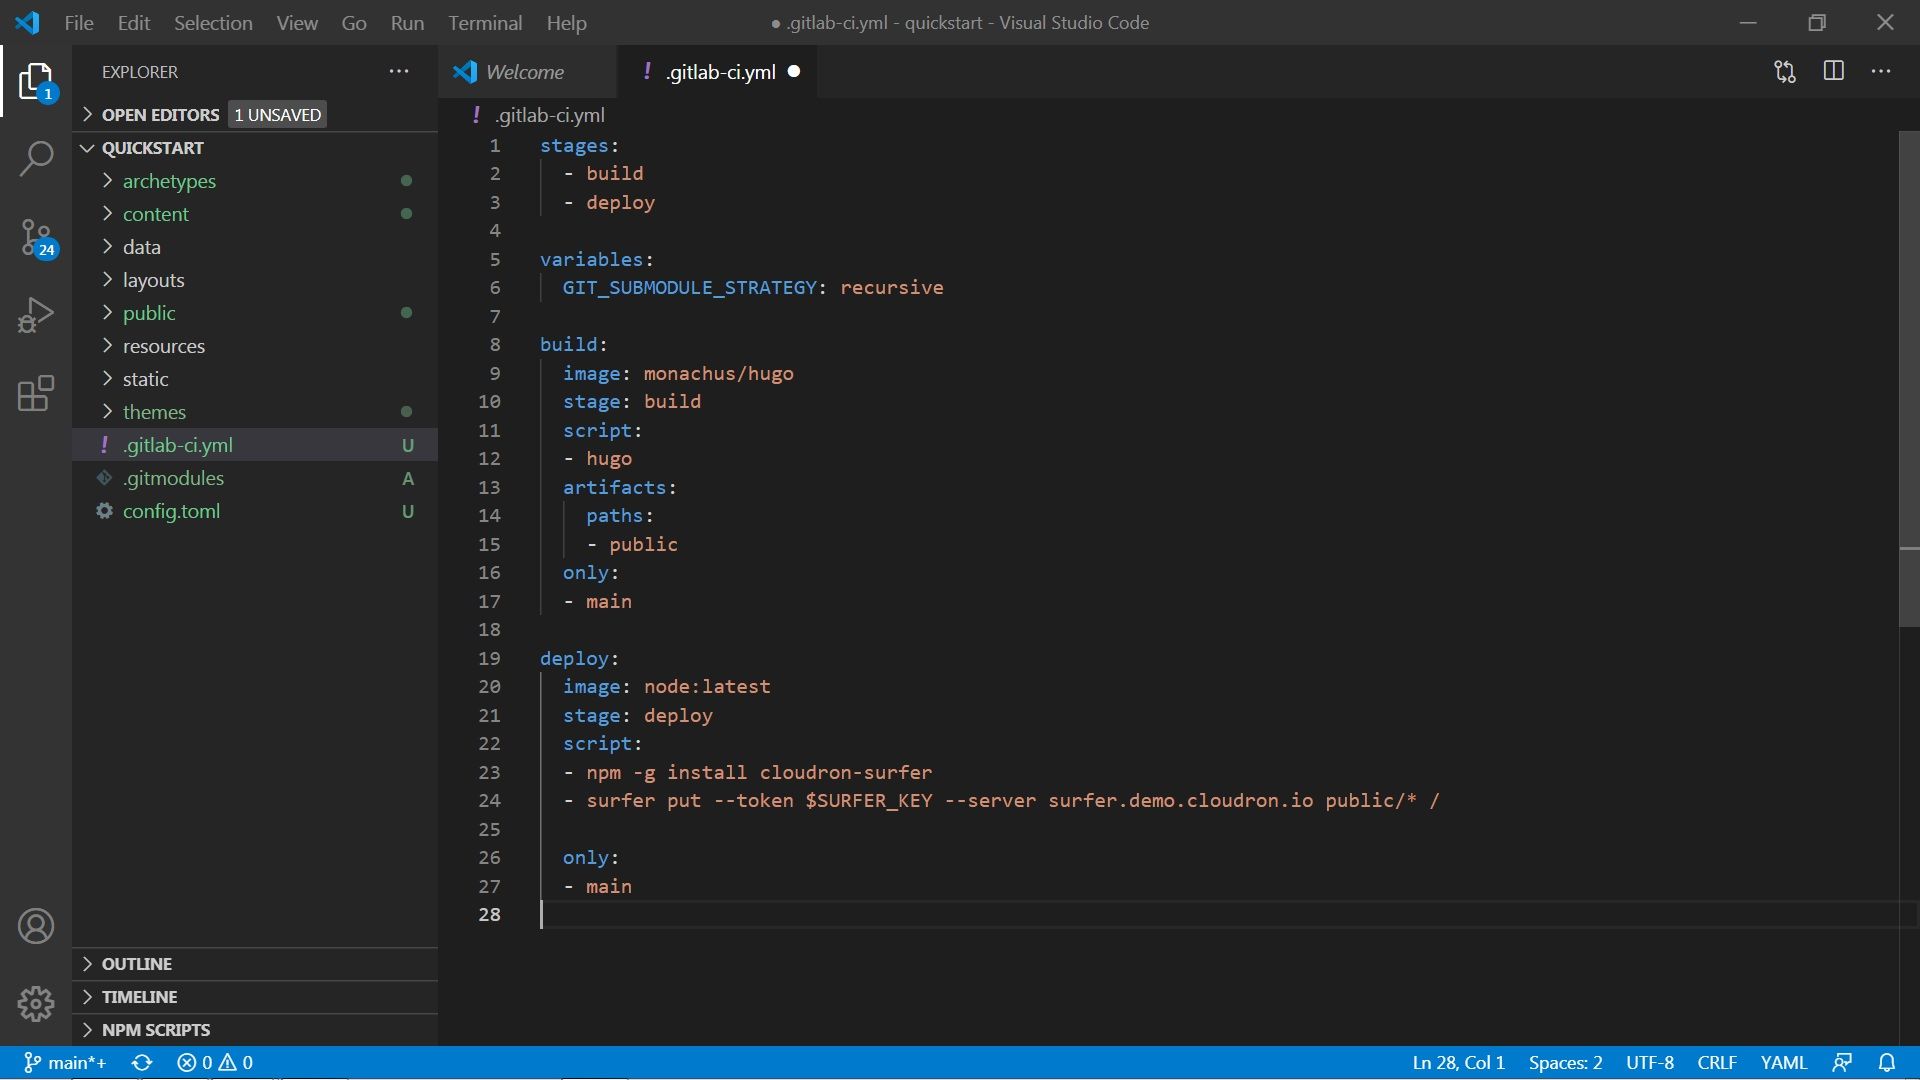
hugo new site quickstart
cd quickstart
git init
git remote add origin https://gitlab.com/vjvanjungg/hugo-surfer-demo.git
git submodule add https://github.com/budparr/gohugo-theme-ananke.git themes/ananke
echo theme = "ananke" >> config.toml
hugo new posts/my-first-post.md
hugo -D
Then, at command #11 if you're using Visual Studio Code or any other code editor you like, open it up to add a new file called .gitlab-ci.yml:
Adding .gitlab-ci.yml:
The content of the file .gitlab-ci.yml is as follows. If you're hosting Surfer at a different url, remember to change it from surfer.demo.cloudron.io below to your url.
stages:
  - build
  - deploy

variables:
  GIT_SUBMODULE_STRATEGY: recursive

build:
  image: monachus/hugo
  stage: build
  script:
  - hugo
  artifacts:
    paths:
    - public
  only:
  - main

deploy:
  image: node:latest
  stage: deploy
  script:
  - npm -g install cloudron-surfer
  - surfer put --token $SURFER_KEY --server surfer.demo.cloudron.io public/* /

  only:
  - main
After this, get the access token from Surfer:
Then, go to your GitLab project --> Settings --> CI / CD. Find the Variables section and click Add Variable:
And all you need now is to run the rest of the commands, they are:
git status # just to see the file status not 100% necessary
git add . # the dot means add everything
git commit -m "Push to gitlab" # commit with any note/message you like
git push -u origin main # push local files to remote GitLab project
When you first do git push on your computer, you may be asked to enter your GitLab credentials. And voila, you're done!!
After git push, you can see the magic happens in GitLab. The blue clock means the pipeline is running.
After it succeeds, it will show:
Navigate to your Surfer url, and enjoy your new site!
I hope it helps! This is the least I can do for a wonderful community that has helped me so much.@vjvanjungg Great tutorial! I wouldn't have guessed it'd be so easy to have a full CI + deploy for a static site all within Cloudron.
-
@vjvanjungg very nice, concise and crisp reading! Don't you need to setup a build server for the gitlab pipeline to work? Or did I miss that part in the tutorial?
@girish This appears to be on gitlab.com so it uses their shared CI runners.
@vjvanjungg I would suggest adding a note about using a Cloudron or other self hosted gitlab instance. You would need to host your own gitlab-runner for this to work.
I am now realizing that I didn't include this in my guide...
-
@girish This appears to be on gitlab.com so it uses their shared CI runners.
@vjvanjungg I would suggest adding a note about using a Cloudron or other self hosted gitlab instance. You would need to host your own gitlab-runner for this to work.
I am now realizing that I didn't include this in my guide...
@atrilahiji said in Beginner's Guide: Hugo + Gitlab CI + Surfer:
@girish This appears to be on gitlab.com so it uses their shared CI runners.
Yes, my bad, I missed the gitlab.com URL !
-
Either way guides like this are perfect. IMO git driven static sites via static site generators are the best way to do static sites. No sense having a server or DB behind a site to serve articles or add new pages.
Best part is, if you want to roll back a change you have the entire history of your site available as "backups" on git. Just revert a commit.
")
-
@vjvanjungg Great tutorial! I wouldn't have guessed it'd be so easy to have a full CI + deploy for a static site all within Cloudron.
@adrw yesh, me too when i saw it live! shout out to @atrilahiji too, if you haven’t watched his video come and watch it , it’s what inspired this one with great info:
https://video.lahijiapps.dev/videos/watch/3540b0bb-553f-43bb-8087-fa8e26fd0d46
-
@adrw yesh, me too when i saw it live! shout out to @atrilahiji too, if you haven’t watched his video come and watch it , it’s what inspired this one with great info:
https://video.lahijiapps.dev/videos/watch/3540b0bb-553f-43bb-8087-fa8e26fd0d46
@vjvanjungg glad it could help! I’m hoping to get around to making more guides for things but I do this reactively mostly. Perhaps a guide for building basic Vue frontend apps or personal sites?
-
does gitea or gogs not have any CI?
-
Drone indeed integrates quite easily with Gitea. More information on my app offering can be found at https://forum.cloudron.io/topic/3350/offered-drone-ci-on-cloudron
The one thing I particularly like is that I only need the "Dashboard" to be centrally hosted, all the job runners can run inside private networks. The runner is a small golang binary that can easily be launched with docker-compose. This allows me to simply start the runner on whatever device I am currently working (desktop, laptop, chromebook, mini homeserver).
This is my drone configuration to build my hugo site and deploy it to my surfer instance:
--- kind: pipeline name: blog concurrency: limit: 1 steps: - name: submodules image: alpine/git commands: - git submodule update --init --recursive --remote - name: build image: plugins/hugo settings: hugo_version: 0.79.0 extended: true validate: true - name: deploy image: 'fbartels/cloudron-surfer:5.12.2' environment: SURFTOKEN: from_secret: surftoken commands: - surfer --version - touch public/ # touch folder to avoid problems with timestamps - surfer put --token $SURFTOKEN --server blog.9wd.eu ./public/* / when: branch: - master event: exclude: - pull_request - name: Notification Rocket.Chat image: rmilewski/drone-rocket:latest when: status: - success - failure settings: webhook: https://chat.9wd.eu/hooks/$(ROCKETSECRET) username: rocket.cat channel: drone color: - value: green when: DRONE_BUILD_STATUS: success - value: red when: DRONE_BUILD_STATUS: failure message: - value: "Build: ${DRONE_BUILD_NUMBER} succeeded. Good job." when: DRONE_BUILD_STATUS: success - value: "Build: ${DRONE_BUILD_NUMBER} failed. Fix me please." text: ${DRONE_COMMIT_MESSAGE} fields: - title: Author value: ${DRONE_COMMIT_AUTHOR} - title: Demo value: "This field will only be visible if the current branch: ${DRONE_COMMIT_BRANCH} is master or production" when: DRONE_COMMIT_BRANCH: - master - production -
Drone indeed integrates quite easily with Gitea. More information on my app offering can be found at https://forum.cloudron.io/topic/3350/offered-drone-ci-on-cloudron
The one thing I particularly like is that I only need the "Dashboard" to be centrally hosted, all the job runners can run inside private networks. The runner is a small golang binary that can easily be launched with docker-compose. This allows me to simply start the runner on whatever device I am currently working (desktop, laptop, chromebook, mini homeserver).
This is my drone configuration to build my hugo site and deploy it to my surfer instance:
--- kind: pipeline name: blog concurrency: limit: 1 steps: - name: submodules image: alpine/git commands: - git submodule update --init --recursive --remote - name: build image: plugins/hugo settings: hugo_version: 0.79.0 extended: true validate: true - name: deploy image: 'fbartels/cloudron-surfer:5.12.2' environment: SURFTOKEN: from_secret: surftoken commands: - surfer --version - touch public/ # touch folder to avoid problems with timestamps - surfer put --token $SURFTOKEN --server blog.9wd.eu ./public/* / when: branch: - master event: exclude: - pull_request - name: Notification Rocket.Chat image: rmilewski/drone-rocket:latest when: status: - success - failure settings: webhook: https://chat.9wd.eu/hooks/$(ROCKETSECRET) username: rocket.cat channel: drone color: - value: green when: DRONE_BUILD_STATUS: success - value: red when: DRONE_BUILD_STATUS: failure message: - value: "Build: ${DRONE_BUILD_NUMBER} succeeded. Good job." when: DRONE_BUILD_STATUS: success - value: "Build: ${DRONE_BUILD_NUMBER} failed. Fix me please." text: ${DRONE_COMMIT_MESSAGE} fields: - title: Author value: ${DRONE_COMMIT_AUTHOR} - title: Demo value: "This field will only be visible if the current branch: ${DRONE_COMMIT_BRANCH} is master or production" when: DRONE_COMMIT_BRANCH: - master - production@fbartels IIRC, a complication with packaging drone was that it required ENV vars to be set before the app is even started. Like you have to select the integration type etc. Is that still the case? If so, how would a Cloudron installation UX for this look like? Just choose some default and let the user edit the config file?
-
@fbartels IIRC, a complication with packaging drone was that it required ENV vars to be set before the app is even started. Like you have to select the integration type etc. Is that still the case? If so, how would a Cloudron installation UX for this look like? Just choose some default and let the user edit the config file?
@girish kind of what @robi said. At first startup it creates a config file in the app that still needs to be manually edited in regards to where Gitea can be reached as well as its configured client id and secret.
I did add you to the repo a while ago, so you can also have a direct look at https://github.com/fbartels/cloudron-drone-app/
-
@girish kind of what @robi said. At first startup it creates a config file in the app that still needs to be manually edited in regards to where Gitea can be reached as well as its configured client id and secret.
I did add you to the repo a while ago, so you can also have a direct look at https://github.com/fbartels/cloudron-drone-app/
@fbartels said in Beginner's Guide: Hugo + Gitlab CI + Surfer:
I did add you to the repo a while ago, so you can also have a direct look at https://github.com/fbartels/cloudron-drone-app/
I'm getting a 404 there.
-
@fbartels said in Beginner's Guide: Hugo + Gitlab CI + Surfer:
I did add you to the repo a while ago, so you can also have a direct look at https://github.com/fbartels/cloudron-drone-app/
I'm getting a 404 there.
@jdaviescoates Its a private repo. He'd have to invite you to it via your Github account.
-
@fbartels said in Beginner's Guide: Hugo + Gitlab CI + Surfer:
I did add you to the repo a while ago, so you can also have a direct look at https://github.com/fbartels/cloudron-drone-app/
I'm getting a 404 there.
@jdaviescoates it's a private repo. You can get access by sponsoring me on GitHub. More details at https://forum.cloudron.io/topic/3350/offered-drone-ci-on-cloudron
-
@jdaviescoates it's a private repo. You can get access by sponsoring me on GitHub. More details at https://forum.cloudron.io/topic/3350/offered-drone-ci-on-cloudron
@fbartels Beat me to it :^)
Hello! It looks like you're interested in this conversation, but you don't have an account yet.
Getting fed up of having to scroll through the same posts each visit? When you register for an account, you'll always come back to exactly where you were before, and choose to be notified of new replies (either via email, or push notification). You'll also be able to save bookmarks and upvote posts to show your appreciation to other community members.
With your input, this post could be even better 💗
Register Login